Windows Packaging
You can learn more about signing and packaging of Windows Store Apps on MSDN.
To be able to correctly package and sign Windows apps there are few things required:
- A signing certificate
- Identity details matching the provided signing certificate
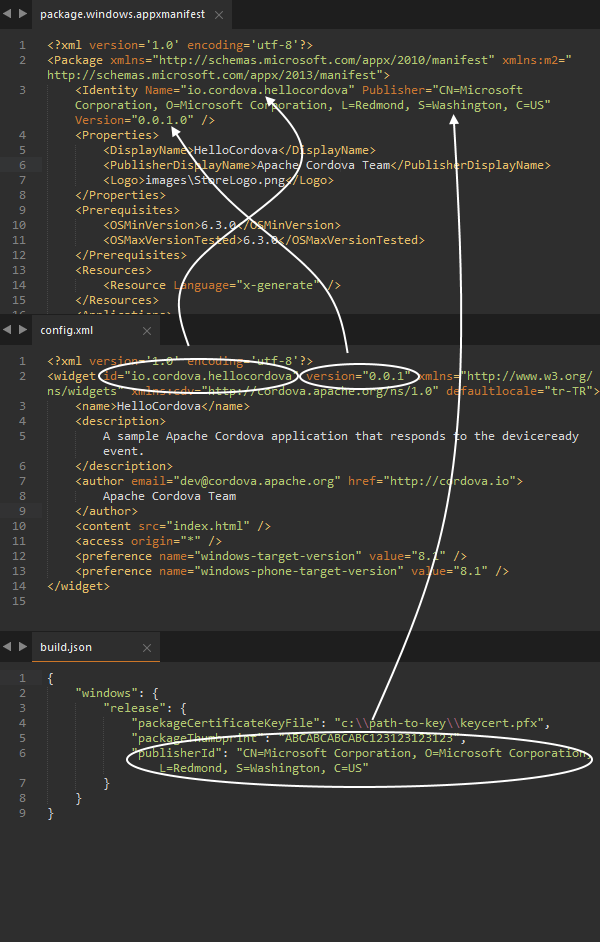
In Windows project, identity details are kept in a file named package.appxmanifest. This file is automatically populated every time a Cordova app is built. Identity holds 3 important fields.
- Name
- Publisher
- Version
Name and Version can be set from config.xml. Publisher can be provided by a signing certificate .pfx as a build parameter or can be set on build.json file.

A signing certificate can be provided from either CLI or through build.json file. The certificate related CLI flags are:
--packageCertificateKeyFile: Once a package signing certificate is created, this parameter can be used to associate the certificate with the app. This flag takes a file path as an argument. Eg.> cordova build -- --packageCertificateKeyFile="platforms\windows\CordovaApp_TemporaryKey.pfx"--packageThumbprint: Package thumbprint is used to validate the authenticity of package certificate key file. When creating a certificate key file, this value will be provided to the end user. Eg.> cordova build -- --packageCertificateKeyFile="platforms\windows\CordovaApp_TemporaryKey.pfx" --packageThumbprint="ABCABCABCABC123123123123"
Alternatively, these values could be specified using a build configuration file (build.json) using CLI (--buildConfig). A sample build configuration file:
{
    "windows": {
        "debug": {
            "packageCertificateKeyFile": "platforms\\windows\\CordovaApp_TemporaryKey.pfx"
        },
        "release": {
            "packageCertificateKeyFile": "c:\\path-to-key\\keycert.pfx",
            "packageThumbprint": "ABCABCABCABC123123123123"
        }
    }
}
There is also support to mix and match command line arguments and parameters in build.json file. Values from the command line arguments will get precedence.
How to create a certificate key and sign Cordova windows Apps
Signing is required for distributing and installing Windows Store apps. This process is normally handled by Visual Studio when you deploy a package for release. To do this without Visual Studio we need to create our own certificates.
For creating certificates we need to use makecert.exe util. This tool ships with Windows SDK and can be found under %ProgramFiles(x86)%\Windows Kits\8.1\bin\x64 or %ProgramFiles(x86)%\Windows Kits\8.1\bin\x86.
The first thing we need to do is to create a root key for signing our app.
makecert.exe -n "CN=FakeCorp.com" -r -eku "1.3.6.1.5.5.7.3.3,1.3.6.1.4.1.311.10.3.13" -e "01/01/2020" -h 0 -sv FakeCorp.com.pvk FakeCorp.com.cer
To understand what makecert does, here's a brief explanation of what parameters do:
- -n "CN=FakeCorp.com" : This is the certificate subject X.509 name. In this example it's CommonName=FakeCorp.com.
- -r : Creates a self signed certificate.
- -eku #EKU_VAL# : Comma separated enhanced key usage OIDs.
- 1.3.6.1.5.5.7.3.3 indicates that the certificate is valid for code signing. Always specify this value to limit the intended use for the certificate.
- 1.3.6.1.4.1.311.10.3.13 indicates that the certificate respects lifetime signing. Typically, if a signature is time stamped, as long as the certificate was valid at the point when it was time stamped, the signature remains valid even if the certificate expires. This EKU forces the signature to expire regardless of whether the signature is time stamped.
- -e "01/01/2020" : Sets the expiration date of the certificate.
- -h 0 : Sets max height of the tree below this cert to 0 to prevent the certificate from being used as a Certification Authority (CA) that can issue other certificates.
- -sv FakeCorp.com.pvk : Output PVK file. Windows uses PVK files to store private keys for code signing.
- FakeCorp.com.cer : Output certificate file. CER file is used to store X.509 certificate.
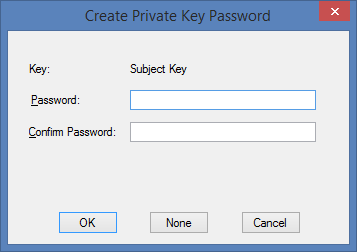
After running makecert for the first time, enter the private password on the screen that pops up:

Once pvk and cer file is created, we need to create a pfx file from these certificates. A pfx (Personal Exchange Format) file contains a variety of cryptographic information, such as certificates, root authority certificates, certificate chains and private keys. To package the certs, we will use the a tool called pvk2pfx. This tool ships with Windows SDK and can be found under %ProgramFiles(x86)%\Windows Kits\8.1\bin\x64 or %ProgramFiles(x86)%\Windows Kits\8.1\bin\x86.
pvk2pfx -pvk FakeCorp.com.pvk -pi pvkPassword -spc FakeCorp.com.cer -pfx FakeCorp.com.pfx -po pfxPassword
Where:
- pvk : Input pvk file name
- pi : pvk password
- spc : Input cert file name
- pfx : Output pfx file name
- po : pfx password; same as pvk password if not provided
If we provide this pfx file to build.json file, we will have the following error: "The key file may be password protected. To correct this, try to import the certificate manually into the current user's personal certificate store.". In order to import it we have to use certutil from an admin prompt:
certutil -user -p PASSWORD -importPFX FakeCorp.com.pfx
Where:
- user : Specifies "current user" personal store
- p : Password for pfx file
- importPfx : Name of pfx file
Once installed, next step is to add packageThumbprint and packageCertificateKeyFile to build.json. In order to find the packageThumbprint, search for the CommonName we've associated with the certificate:
powershell -Command " & {dir -path cert:\LocalMachine\My | where { $_.Subject -like \"*FakeCorp.com*\" }}"
Once these final values are provided. Cordova should successfully package and sign the app.