Getting Started with Windows 8
This guide describes how to set up your development environment for Cordova and run a sample application. Note that Cordova used to be called PhoneGap, so some of the sites still use the old PhoneGap name.
During development of Windows 8 and Windows RT, Microsoft deprecated the name "Metro-style apps". On MSDN, this type of app is now called a "Windows Store" app. That's the name that we'll use in this guide. Also in this guide whenever we refer to Windows 8, you should take that to mean both Windows 8 and Windows RT.
-
Requirements
-
Windows 8
-
Visual Studio 2012 Professional or better, or Visual Studio 2012 Express for Windows 8
Follow the instructions here to submit your apps Windows Store.
-
Install SDK + Cordova
- Setup your preferred variant of Visual Studio 2012. All of the paid versions of the product (Professional, etc) let you build Windows Store apps. To build Windows Store apps using the Express editions, you will need Express for Windows 8.
- Download the latest copy of Cordova and extract its contents. We will be working with the subfolder lib\windows-8.
-
Setup New Project
You can already build Windows 8 apps using the "HTML/JavaScript track" available in Windows Store apps. The purpose of Cordova in Windows Store apps is to expose the same APIs used on all the other Cordova platforms.
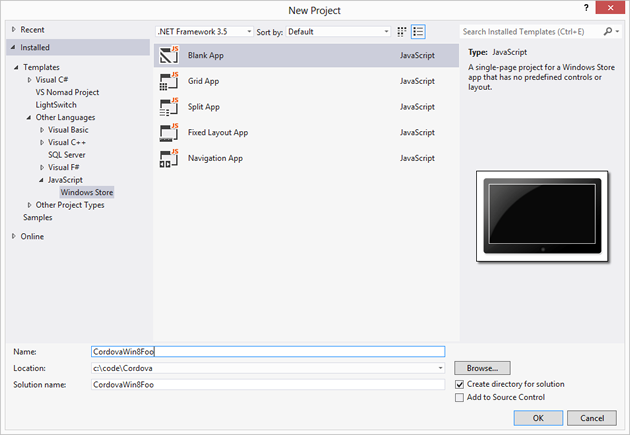
- Open Visual Studio 2012 and choose New Project.
-
Select Installed - Template - Other Languages - JavaScript - Windows Store from the tree, and then Blank App from the projects list. Enter whatever project name you like. We're using CordovaWin8Foo in this guide.
-
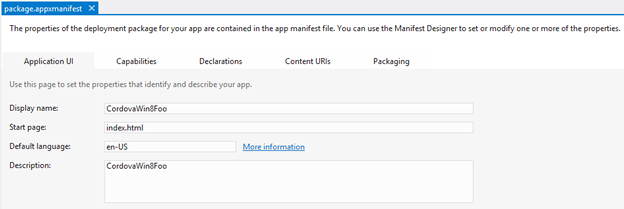
Microsoft continues to use default.html as the default page for use in websites, whereas most "open web" developers use index.html. (Plus it's likely that in the other platform variants of your project you are using index.html as the name of your default page.) To fix this, in Solution Explorer rename the default.html file to index.html. Then double-click the package.appxmanifest file and change the Start page value to index.html.
-
To include cordova.js in your project, right-click on the js folder in Solution Explorer and select Add - New Item. Locate the cordova.js file in the lib\windows-8 folder that we called out previously.
- Edit the code for index.html. Add a reference to cordova.js. You can do this manually, or by dragging the file from Solution Explorer.
Adding the reference…
    <!-- WinJS references -->
    <link href="//Microsoft.WinJS.1.0/css/ui-dark.css" rel="stylesheet" />
    <script src="//Microsoft.WinJS.1.0/js/base.js"></script>
    <script src="//Microsoft.WinJS.1.0/js/ui.js"></script>

    <!-- Cordova -->
    <script src="/js/cordova.js"></script>

    <!-- CordovaWin8Foo references -->
    <link href="/css/default.css" rel="stylesheet" />
    <script src="/js/default.js"></script>
- Next we want to add some code that will demonstrate that Cordova is working.
Adding a 'deviceready' handler…
<body>
    <p>Content goes here</p>

    <script type="text/javascript">

        console.log("Subscribing...");
        document.addEventListener("[deviceready](../../../cordova/events/events.deviceready.html)", function () {

            navigator.notification.alert("The device is ready!");

        });

    </script>

</body>
-
Test the Project
-
Run the project from Visual Studio. You'll see the message box appear.

Done!
That's it! You're now ready to build Windows Store apps with Cordova.