Getting Started with Windows Phone 7
This guide describes how to set up your development environment for Cordova and run a sample application. Note that Cordova used to be called PhoneGap, so some of the sites still use the old PhoneGap name.
Video Tutorials:
-
Requirements
- Windows 7 or Windows Vista with SP2
Note: Running in VM has issues, if you are on a Mac, you will need to setup a bootcamp partition with Windows 7 or Vista
Necessary for Installing on Device and Submitting to Market Place:
- Become an App Hub member.
-
Install SDK + Cordova
- Download and install Windows Phone SDK
- Download the latest copy of Cordova and extract its contents. We will be working with the subfolder: lib\windows-phone\
- copy the file CordovaStarter-x.x.x.zip to the folder : \My Documents\Visual Studio 2010\Templates\ProjectTemplates
( if the template file does not exist, you will need to build it. See 2.1 below ) if you have just installed VisualStudio, you should launch it once to create this folder if you prefer, you may add the project instead to the "Silverlight for Windows Phone" subfolder of "Visual C#". This is up to you, and only affects where the project template is shown when creating a new project. Also, You may need to create this folder.
2.1. Building the template
( note, this step may not be required. If the lib\windows-phone directory already contains a file CordovaStarter-x.x.x.zip then you may skip this step )
- Open the file lib\windows-phone\templates\standalone\CordovaSolution.sln in Visual Studio Express for Windows Phone
- From the file menu, select 'Export Template…'
- Choose template type 'Project template'
- Give the exported template a name, ex. CordovaStarter-2.1.0 will produce CordovaStarter-2.1.0.zip
- Optionally, you may add a description, icon image, and Preview image. These are what is displayed in Visual Studio in the 'New Project' dialog.-
- Note: If you select ( 'Automatically import the template … ') then you will not need to copy the .zip file over as outlined in step 2.
- Press 'Finish'
-
Setup New Project
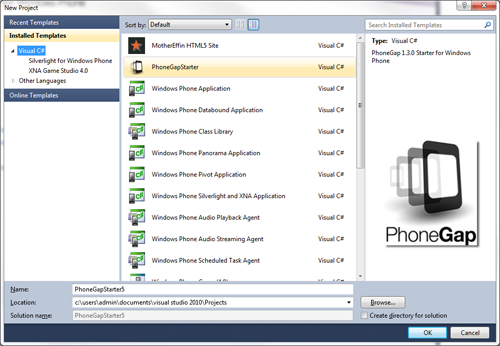
- Open Visual Studio Express for Windows Phone and choose New Project.
- Select CordovaStarter. ( the version number will be displayed in the template description )
-
- note: If you do not see it, you may have to select the top level 'Visual C#' to see it
-
Give your project a name, and select OK.

-
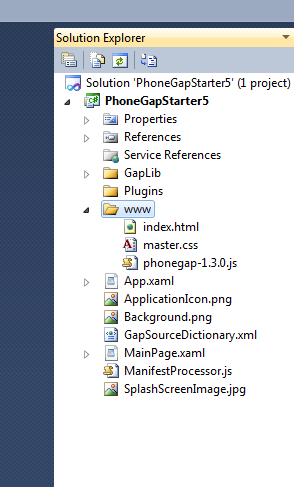
Review the project structure
- The 'www' folder contains your Cordova html/js/css and any other resources included in your app.
-
Any content that you add here needs to be a part of the Visual Studio project, and it must be set as content.

-
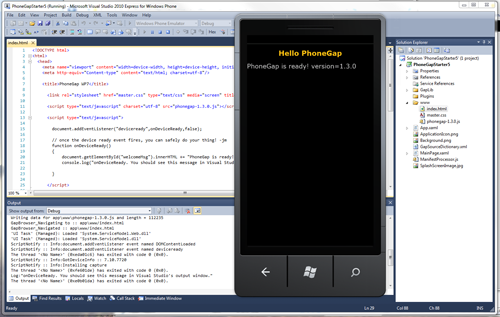
Build and Deploy to Emulator
- Make sure to have Windows Phone Emulator selected in the top drop-down menu.
-
Hit the green play button beside the Windows Phone Emulator drop-down menu to start debugging or press F5.


-
Build your project for the device
In order to test your application on a device, the device must be registered. Click here to read documentation on deploying and testing on your Windows Phone.
- Make sure your phone is connected, and the screen is unlocked
- In Visual Studio, select 'Windows Phone Device' from the top drop-down menu.
-
Hit the green play button beside the drop-down menu to start debugging or press F5.

Done!
You can also checkout more detailed version of this guide here.