Windows Platform Guide
This guide shows how to set up your SDK development environment to build and deploy Cordova apps for Windows 8.1, Windows Phone 8.1, and Windows 10 Universal App Platform. It shows how to use either shell tools to generate and build apps, or the cross-platform Cordova CLI. (See the Overview for a comparison of these development options.) This section also shows how to modify Cordova apps within Visual Studio. Regardless of which approach you take, you need to install the Visual Studio SDK, as described below.
Developers wishing to target Windows Phone 8 should use the wp8 platform, see Windows Phone 8 Platform Guide for details (Warning, the wp8 platform is deprecated).
Cordova WebViews running on Windows rely on Internet Explorer 11 (Windows 8.1 and Windows Phone 8.1) as their rendering engine, so as a practical matter you can use IE's powerful debugger to test any web content that doesn't invoke Cordova APIs. The Windows Phone Developer Blog provides helpful guidance on how to support IE along with comparable WebKit browsers.
Requirements and Support
To develop apps for Windows platform you need:
-
A Windows 8.1, 32 or 64-bit machine (Home, Pro, or Enterprise editions) with minimum 4 GB of RAM along with Visual Studio 2015 or Visual Studio 2013. An evaluation version of Windows 8.1 Enterprise is available from the Microsoft Developer Network.
-
For the Windows Phone emulators, Windows 8.1 (x64) Professional edition or higher, and a processor that supports Client Hyper-V and Second Level Address Translation (SLAT).
To develop apps for Windows 10:
- Windows 8.1 or Windows 10, 32- or 64-bit, along with Visual Studio 2015 or higher.
App compatibility is determined by the OS that the app targeted. Apps are forwardly-compatible but not backwardly-compatible, so an app targeting Windows 10 cannot run on 8.1, but an app built for 8.1 can run on 10.
Cordova apps targeting Windows can be developed on a Mac, either by running a virtual machine environment or by using Boot Camp to dual-boot a Windows 8.1 partition. Consult these resources to set up the required Windows development environment on a Mac:
Installing the Requirements
Install any edition of Visual Studio matching the version requirements listed above.
The tools and SDKs for the target Windows platforms (UWP, 8.1, etc.) must also be selected in the installer. They can be found under the "Windows and Web Development" heading.
<p align="center"> </p>
</p>
Project Configuration
Target Windows version
After installation, you should be ready to develop apps targetting Windows platform. Refer to Create your first app guide for details.
By default the cordova build command produces two packages: Windows 8.1 and Windows Phone 8.1.
To upgrade Windows package to version 10 the following configuration setting must be
added to configuration file (config.xml).
<preference name="windows-target-version" value="10.0" />
Once you add this setting build command will start producing Windows 10 packages.
Considerations for target Windows version
Windows 10 supports a new "Remote" mode for Cordova apps (and HTML apps in general). This mode enables apps to have much more freedom with respect to use of DOM manipulation and common web patterns such as the use of inline script, but does so by reducing the set of capabilities your app may use when submitted to the public Windows Store. For more information about Windows 10 and Remote Mode, look at the Understanding Remote Mode vs Local Mode section.
When using Remote Mode, developers are encouraged to apply a Content Security Policy (CSP) to their application to prevent script injection attacks.
The --appx parameter
You may decide that you want to build a particular version of your application targeting a particular OS (for example, you might have set that you want to target Windows 10, but you want to build for Windows Phone 8.1). To do this, you can use the --appx parameter:
cordova build windows -- --appx=8.1-phone
The build system will ignore the preference set in config.xml for the target Windows version and strictly build a package for Windows Phone 8.1.
Valid values for the --appx flag are 8.1-win, 8.1-phone, and uap (for Windows 10 Universal Apps). These options also apply to the cordova run command.
Deploy options
To deploy Windows package:
cordova run windows -- --win  # explicitly specify Windows as deployment target
cordova run windows # `run` uses Windows package by default
To deploy Windows Phone package:
cordova run windows -- --phone  # deploy app to Windows Phone 8.1 emulator
cordova run windows --device -- --phone  # deploy app to connected device
This command will give you the list of all available targets:
cordova run windows --list
This allows you to run the application on a specific device or emulator, in this case "Emulator 8.1 720p 4.7 inch"
cordova run windows --target="Emulator 8.1 720P 4.7 inch" -- --phone
You can also use cordova run --help to see additional build and run options.
Using Visual Studio to deploy the app
Once you build a Cordova app, you can open it with
Visual Studio. The various build commands generate a Visual Studio
Solution (.sln) file. Open the file in the File Explorer to modify
the project within Visual Studio:
<p align="center">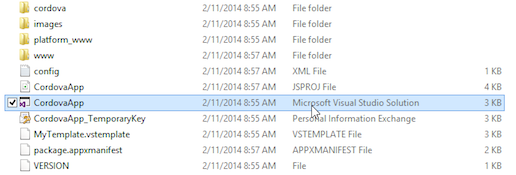 </p>
</p>
The CordovaApp component displays within the solution, and its www
directory contains the web-based source code, including the
index.html home page:
<p align="center">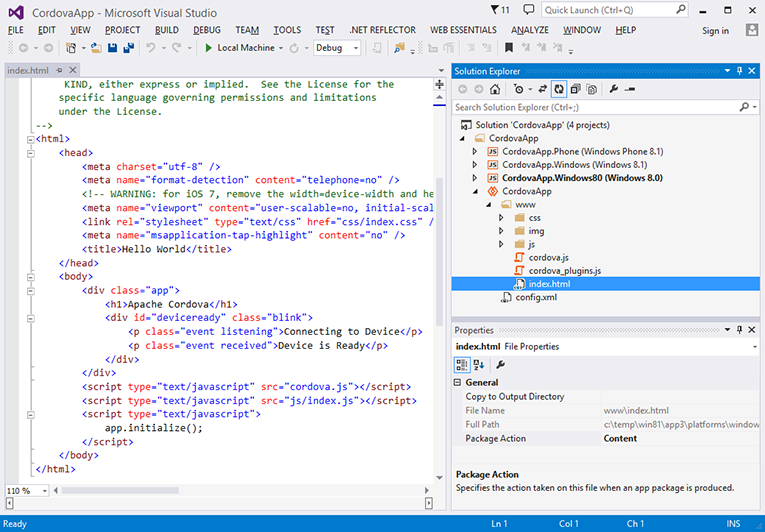 </p>
</p>
The projects for different Windows versions are displayed separately in the solution explorer. You can choose the deploy target version by right clicking the 'solution' (topmost entry in the solution explorer) and then going into 'Properties'. Here you can update the 'Single start up' field. The controls below Visual Studio's main menu allow you to test or deploy the app:
<p align="center">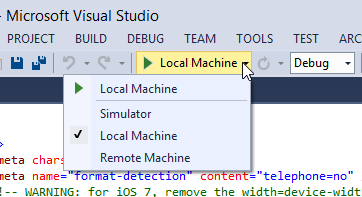 </p>
</p>
With Local Machine selected, press the green arrow to install the app on the same machine running Visual Studio. Once you do so, the app appears in Windows' app listings:
<p align="center">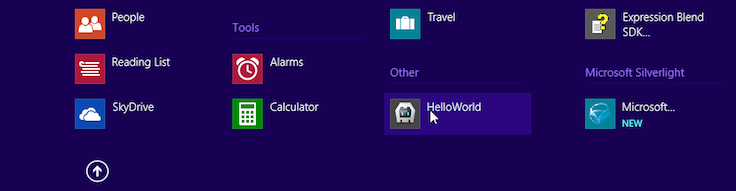 </p>
</p>
Each time you rebuild the app, the version available in the interface is refreshed.
Once available in the app listings, holding down the CTRL key while selecting the app allows you to pin it to the main screen:
<p align="center">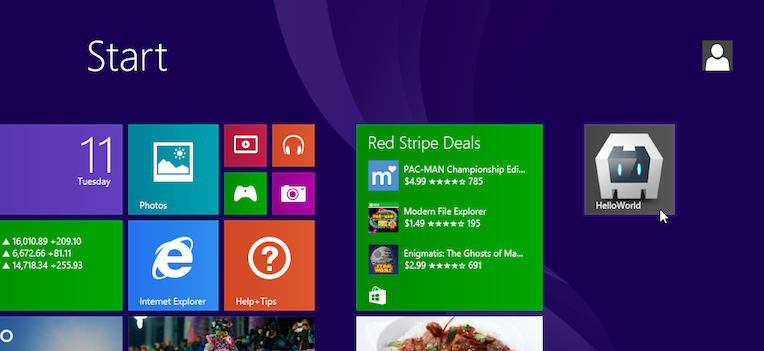 </p>
</p>
Note that if you open the app within a virtual machine environment, you may need to click in the corners or along the sides of the windows to switch apps or access additional functionality:
<p align="center">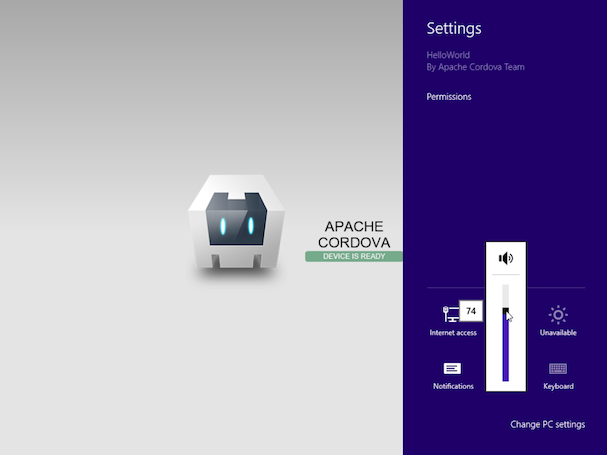 </p>
</p>
Alternately, choose the Simulator deployment option to view the app as if it were running on a tablet device:
<p align="center">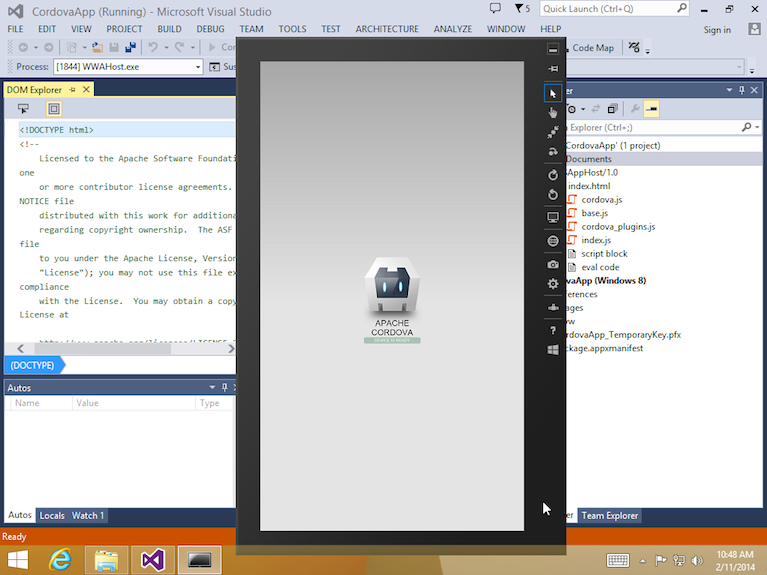 </p>
</p>
Unlike desktop deployment, this option allows you to simulate the tablet's orientation, location, and vary its network settings.
NOTE: Consult the Overview for advice on how to use Cordova's command-line tools or the SDK in your workflow. The Cordova CLI relies on cross-platform source code that routinely overwrites the platform-specific files used by the SDK. If you want to use the SDK to modify the project, use the lower-level shell tools as an alternative to the CLI.
Debugging
Visual Studio provides powerful tools to debug your application. You can refer to this article to get started with it.
Note: Resume and pause events are not triggered normally when debugging apps using Visual Studio. This is because Windows does not suspend your app when it is being debugged. The only way to change the application state is through the 'Lifecycle event' options inside Visual Studio. The events should work as expected when the app is run on a device/emulator without the debugger attached.
Signing an App
You can learn more about signing and packaging of Windows Store Apps on MSDN.
To be able to correctly package and sign Windows apps there are few things required:
- A signing certificate
- Identity details matching the provided signing certificate
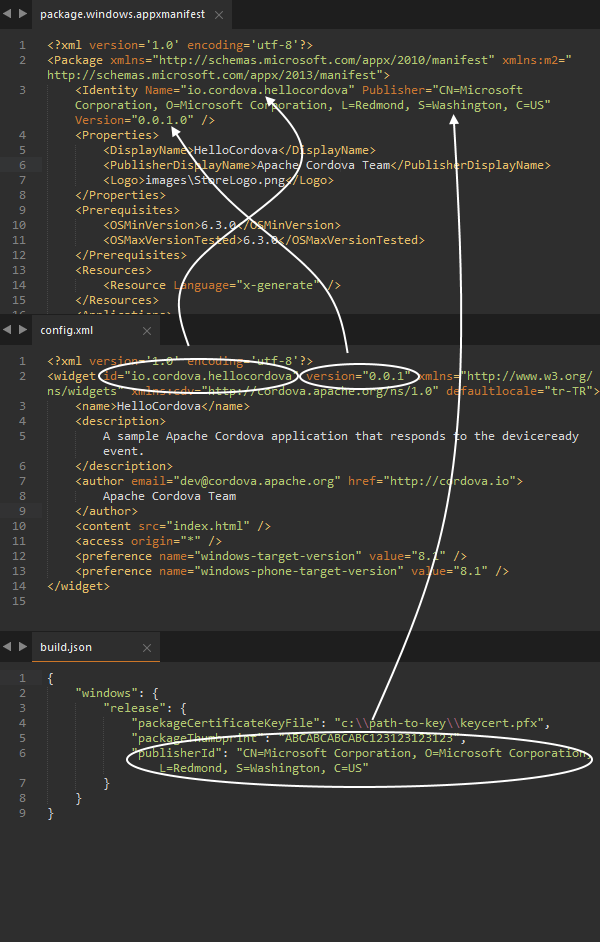
In Windows project, identity details are kept in a file named package.appxmanifest. This file is automatically populated every time a Cordova app is built. Identity holds 3 important fields.
- Name
- Publisher
- Version
Name and Version can be set from config.xml. Publisher can be provided as a build parameter or can be set on build.json file.
A signing certificate can be provided from either CLI or through build.json file. The certificate related CLI flags are:
| Parameter | Flag | Description |
|---|---|---|
| Certificate File | --packageCertificateKeyFile |
Path to the package signing certificate to be associated with the app |
| Thumb Print | --packageThumbprint |
Used to validate the authenticity of package certificate key file. When creating a certificate key file, this value will be provided to the end user |
Example:
cordova build -- --packageCertificateKeyFile="platforms\windows\CordovaApp_TemporaryKey.pfx" --packageThumbprint="ABCABCABCABC123123123123"`
Alternatively, these values could be specified using a build configuration file (build.json) using CLI (--buildConfig). A sample build configuration file:
{
    "windows": {
        "debug": {
            "packageCertificateKeyFile": "platforms\\windows\\CordovaApp_TemporaryKey.pfx"
        },
        "release": {
            "packageCertificateKeyFile": "c:\\path-to-key\\keycert.pfx",
            "packageThumbprint": "ABCABCABCABC123123123123",
            "publisherId": "CN=FakeCorp.com, L=Redmond, S=Washington, C=US"
        }
    }
}
There is also support to mix and match command line arguments and parameters in build.json file. Values from the command line arguments will get precedence.
Creating a certificate key
Signing is required for distributing and installing Windows Store apps. This process is normally handled by Visual Studio when you deploy a package for release. To do this without Visual Studio we need to create our own certificates. This article has instructions on how to do that.
Once you have the pfx file created and provided to build.json file, you might get the following error: "The key file may be password protected. To correct this, try to import the certificate manually into the current user's personal certificate store.". In order to import it you have to use certutil from an admin prompt:
certutil -user -p PASSWORD -importPFX FakeCorp.com.pfx
Where:
- user : Specifies "current user" personal store
- p : Password for pfx file
- importPfx : Name of pfx file
Once installed, next step is to add packageThumbprint and packageCertificateKeyFile to build.json. In order to find the packageThumbprint, search for the CommonName you've associated with the certificate:
powershell -Command " & {dir -path cert:\LocalMachine\My | where { $_.Subject -like \"*FakeCorp.com*\" }}"
Once these final values are provided. Cordova should successfully package and sign the app.
Platform Centered Workflow
If you want to use Cordova's Windows-centered shell tools in conjunction with the SDK, you have two basic options:
-
Access them locally from project code generated by the CLI. They are available in the
platforms/windows/directory after you add thewindowsplatform as described below. -
Download them from a separate distribution here. The Cordova distribution contains separate archives for each platform. Be sure to expand the appropriate archive,
cordova-windowsin this case, within an empty directory. The relevant batch utilities are available inpackage/bindirectory. (Consult the README file if necessary for more detailed directions.)
These shell tools allow you to create, build, and run Windows apps. Each cordova command corresponds to one of these shell tool scripts.
For example, the lower-level shell-tool approach corresponding to cordova create HelloWorld is:
C:\path\to\cordova-windows\package\bin\create.bat C:\path\to\new\hello HelloWorld
Similarly for cordova build --debug:
C:\path\to\project\cordova\build.bat --debug
Upgrading
Refer to this article for instructions to upgrade your cordova-windows version.
Supporting Toasts
Windows requires an app manifest capability declaration in order to support
toast notifications. When using the cordova-plugin-local-notifications
plugin, or any other plugin that is attempting to use toast notifications,
add the following preference to your config.xml to enable it to publish
toast notifications, unless the plugin makes that change on it's own:
<preference name="WindowsToastCapable" value="true" />
This preference sets the corresponding flag in your app manifest. Plugins should do the work necessary to configure the appearance of the displayed notifications.
Understanding Remote Mode vs Local Mode
Windows 10 introduces a new feature called "Remote mode" for HTML applications. Prior to it, Windows 8.1 apps
worked on what is now termed as "Local Mode" in Windows 10, in which HTML Applications have full access to the native
Windows API surface and capabilities. Local Mode disallows inline script in order to prevent script injection attacks,
which could result in leaking personally-identifiable information due to malicious code. It also requires developers who
perform DOM manipulation to do so within an explicit context
(MSApp.execUnsafeLocalFunction).
Remote Mode eliminates those requirements, which makes it possible to use unmodified libraries like jQuery or AngularJS directly in your code, without any changes. To do so, it removes your ability to declare certain capabilities when certifying your app in the Windows Store. The removal of these capabilities usually doesn't prevent accessing certain functionality, but it might require the use of a different combination of APIs or tactics.
Effect of Remote Mode on capabilities
The following capabilities are unavailable when deploying your Remote Mode application to the Windows Store:
- Enterprise Authentication (
enterpriseAuthentication) - Shared User Certificates (
sharedUserCertificates) - Documents Library (
documentsLibrary) - Music Library (
musicLibrary) - Pictures Library (
picturesLibrary) - Videos Library (
videosLibrary) - Removable Storage (
removableStorage) - Internet client/server (
internetClientServer) - note thatinternetClientis still permitted - Private network client/server (
privateNetworkClientServer)
Each of the library restrictions may be worked around by requesting that the user interact with the file system via a File Picker. This prevents malicious injected code from arbitrarily accessing the file system.
The network-related restrictions must be worked around by either using an API that doesn't use capability checks or by brokering communication via standard internet communication channels, such as XMLHttpRequest or Web Sockets.
The Enterprise Authentication and Shared User Certificates capabilities are specifically targeted at Enterprise scenarios. These capabilities are supported for private/enterprise-enabled App Stores, so if you are building apps which are going to be deployed to an internal deployment mechanism, you can still support these. However, they are not supported for Remote Mode apps in the public Windows Store. When you build targeting Windows 10, if one of these capabilities is detected in your app manifest, a warning will be displayed.