Getting Started with Android
This guide describes how to set up your development environment for Cordova and run a sample application.
-
Minimum Requirements for Development
- Identical to Android Minimum Requirements
1.1 Supported Android Devices
- Android 2.1 (Deprecated May 2013)
- Android 2.2
- Android 2.3
- Android 3.x (Deprecated May 2013)
- Android 4.x
We currently do not support Android 1.x, and we plan to deprecate platforms in the future as they are updated and dip below 5% on the distribution dashboard provided by Google.
-
Install SDK + Cordova
- Download and install Eclipse Classic
- Download and install Android SDK
- Download and install ADT Plugin
- Download the latest copy of Cordova and extract its contents. We will be working with the Android directory.
3A. Setup your PATH environment variable on Mac OS
- Open the Terminal program (this is in your Applications/Utilites folder by default).
- Run the following command
touch ~/.bash_profile; open ~/.bash_profile
- This will open the file in the your default text editor.
- You need to add the path to your Android SDK platform-tools and tools directory. In my example I will use "/Development/android-sdk-macosx" as the directory the SDK is installed in. Add the following line:
export PATH=${PATH}:/Development/android-sdk-macosx/platform-tools:/Development/android-sdk-macosx/tools
- Save the file and quit the text editor.
- Execute your .bash_profile to update your PATH.
source ~/.bash_profile
- Now everytime you open the Terminal program you PATH will included the Android SDK.
3B. Setup your PATH environment variable on Windows
- From the Desktop, right-click My Computer and click Properties.
- Click Advanced System Settings link in the left column.
- In the System Properties window click the Environment Variables button.
- Select the PATH variable from the System variables section.
- Select the Edit button.
- You need to add the path to your Android SDK platform-tools and tools directory. In my example I will use "C:\Development\android-sdk-windows" as the directory the SDK is installed in. Append the following text into the text box:
;C:\Development\android-sdk-windows\platform-tools;C:\Development\android-sdk-windows\tools
- Save your edit. Close the Environment Variables dialog.
- Additionally, you may need to include
%JAVA_HOME%\binto your PATH as well. To check to see if this is required, run a command prompt and typejava. If the program can not be found add%JAVA_HOME%\binto the PATH. You may need to specify the full path instead of using the%JAVA_HOME%environment variable. - Finally, you may need to include
%ANT_HOME%\binto your PATH as well. To check to see if this is required, run a command prompt and typeant. If the program can not be found add%ANT_HOME%\binto the PATH. You may need to specify the full path instead of using the%ANT_HOME%environment variable.
-
Setup New Project
- In a terminal window, navigate to the
bindirectory within theandroidsubfolder of the Cordova distribution. -
Type in
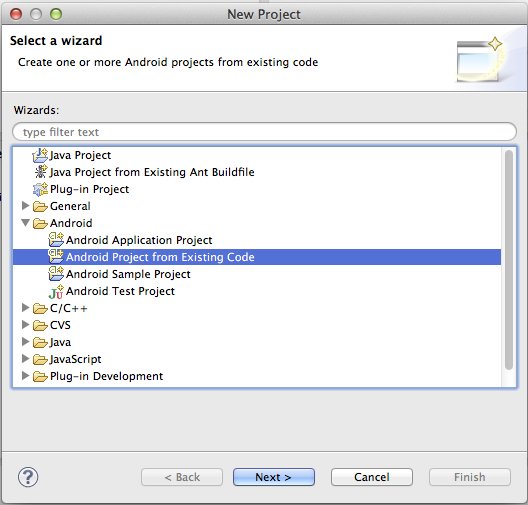
./create <project_folder_path> <package_name> <project_name>then press "Enter"<project_folder_path> is the path to your new Cordova Android project <package_name> is the package name, e.g. com.YourCompany.YourAppName <project_name> is the project name, e.g. YourApp (Must not contain spaces) - Launch Eclipse, and select menu item New Project

- Select the directory you used for
<project_folder_path> - Click Finish.
If your project has a red X indicating there is a problem follow these additional steps:
- Right click on the project folder.
- In the Properties dialog that is displayed select Android from the navigation pane.
- For the project build target select the highest Android API level you have installed.
- Click OK
- Then from the Project menu bar item select Clean.
- This should correct all the errors in the project.
5A. Deploy to Emulator
- Right click the project and go to Run As > Android Application
- Eclipse will ask you to select an appropriate AVD. If there isn't one, then you'll need to create it.
Note: For a faster experience, use an Intel-based emulator image:
- Open the Android SDK Manager

- Install one or more
Intel x86 AtomSystem Images as well as theIntel Hardware Accelerated Execution Manager(under Extras). - Run the Intel installer, which has been downloaded to:
extras/intel/Hardware_Accelerated_Execution_Managerwithin your Android SDK - Create a new AVD with the Target set to an Intel image.
- When starting the emulator, ensure there are no error messages about the HAX module failing to load.
5B. Deploy to Device
- Make sure USB debugging is enabled on your device and plug it into your system. Information can be found on the Android Developer Site
- Right click the project and go to Run As > Android Application