Android Platform Guide
This guide will assist you in setting up your development environment for building Cordova apps on Android devices. Additionally, it provides the option to incorporate Android-specific command-line tools into your development workflow.
Regardless of whether you intend to utilize Android-specific command-line tools or Cordova CLI commands, you will need to install and configure the necessary requirements.
Android API Level Support
The supported Android API Levels (versions of Android) corresponding with the Cordova-Android released versions are listed in the table below:
| cordova-android Version | Android API-Levels (Android Version) | Library & Tooling Version |
|---|---|---|
| 15.0.x | 24 (7.0) - 36 (16.0) |
|
| 14.0.x | 24 (7.0) - 35 (15.0) |
|
| 13.0.x | 24 (7.0) - 34 (14.0) |
|
| 12.0.x | 24 (7.0) - 33 (13.0) |
|
| 11.0.x | 22 (5.1) - 32 (12L) |
|
| 10.1.x | 22 (5.1) - 30 (11.0) |
|
| 10.0.x | 22 (5.1) - 30 (11.0) |
|
| 9.X.X | 22 (5.1) - 29 (10.0) | - |
| 8.X.X | 19 (4.4) - 28 (9.0) | - |
| 7.X.X | 19 (4.4) - 27 (8.1) | - |
| 6.X.X | 16 (4.1) - 26 (8.0) | - |
| 5.X.X | 14 (4.0) - 23 (6.0) | - |
| 4.1.X | 14 (4.0) - 22 (5.1) | - |
| 4.0.X | 10 (2.3.3) - 22 (5.1) | - |
| 3.7.X | 10 (2.3.3) - 21 (5.0) | - |
Note: The cordova-android versions listed above are not the Cordova CLI versions.
To find out the version of the Cordova-Android package installed in your Cordova project, navigate to the root directory of your project and execute the command cordova platform ls.
Cordova generally ceases support for Android versions that fall below 5% on Google's distribution dashboard. You can refer to Google's Distribution dashboard for more information.
System Requirements
Cordova-Android relies on the Android SDK, which can be installed on macOS, Linux, or Windows operating systems.
To ensure your system meets the necessary requirements, please refer to the "Install Android Studio" guide provided by Google.
The Required Software & Tools
Java Development Kit (JDK)
If using cordova-android 13 or later, install the Java Development Kit (JDK) 17.
If using cordova-android 10 through 12, install the Java Development Kit (JDK) 11
If using cordova-android 9 or earlier, install the Java Development Kit (JDK) 8.
The JAVA_HOME environment variable must be set according to your JDK installation path. See the Setting Environment Variables section on how to set up environment variables. Alternatively as of cordova-android 10.0.0 or greater, CORDOVA_JAVA_HOME can be set in place of JAVA_HOME, allowing a JDK install to be used specifically for Cordova development.
Gradle
As of Cordova-Android 6.4.0, Gradle is required to be installed.
When installing on Windows, you need to add the path to the Gradle's binary directory to your path environment variable. See Setting Environment Variables) on how to configure system environment variables.
Note: This is the system's Gradle version. The system's Gradle binary will create the Gradle Wrapper file that declares and obtains the appropriate version of Gradle needed for building the Android application. The system-level and project-level version of Gradle may not and does not need to match. The project-level's version of Gradle is defined in the Cordova-Android's package and set based on what Android supports.
Android Studio
Download and install Android Studio. Follow the instructions at the linked Android Developer site to get started.
Opening Android Studio for the first time will guide you through the process of installing the Android SDK packages.
SDK Packages
It is recommended to install the latest version of the SDK Platform & SDK Tools based on the project's installed version of Cordova-Android. Refer to the Android API Level Support section to find which version is supported based on the Cordova-Android version.
Installing SDK Platform
- Open Android Studio's
- Open SDK Manager (
Tools > SDK Manager) - Click on the SDK Platforms tab
- Select the Android version which matches the highest supported SDK based from the Android API Level Support
- Click Apply
For example: If the project has installed cordova-android@12.0.0, the highest supported SDK is 33. In step 3, of the above, "Android 13.0 (Tiramisu)", should have been selected.

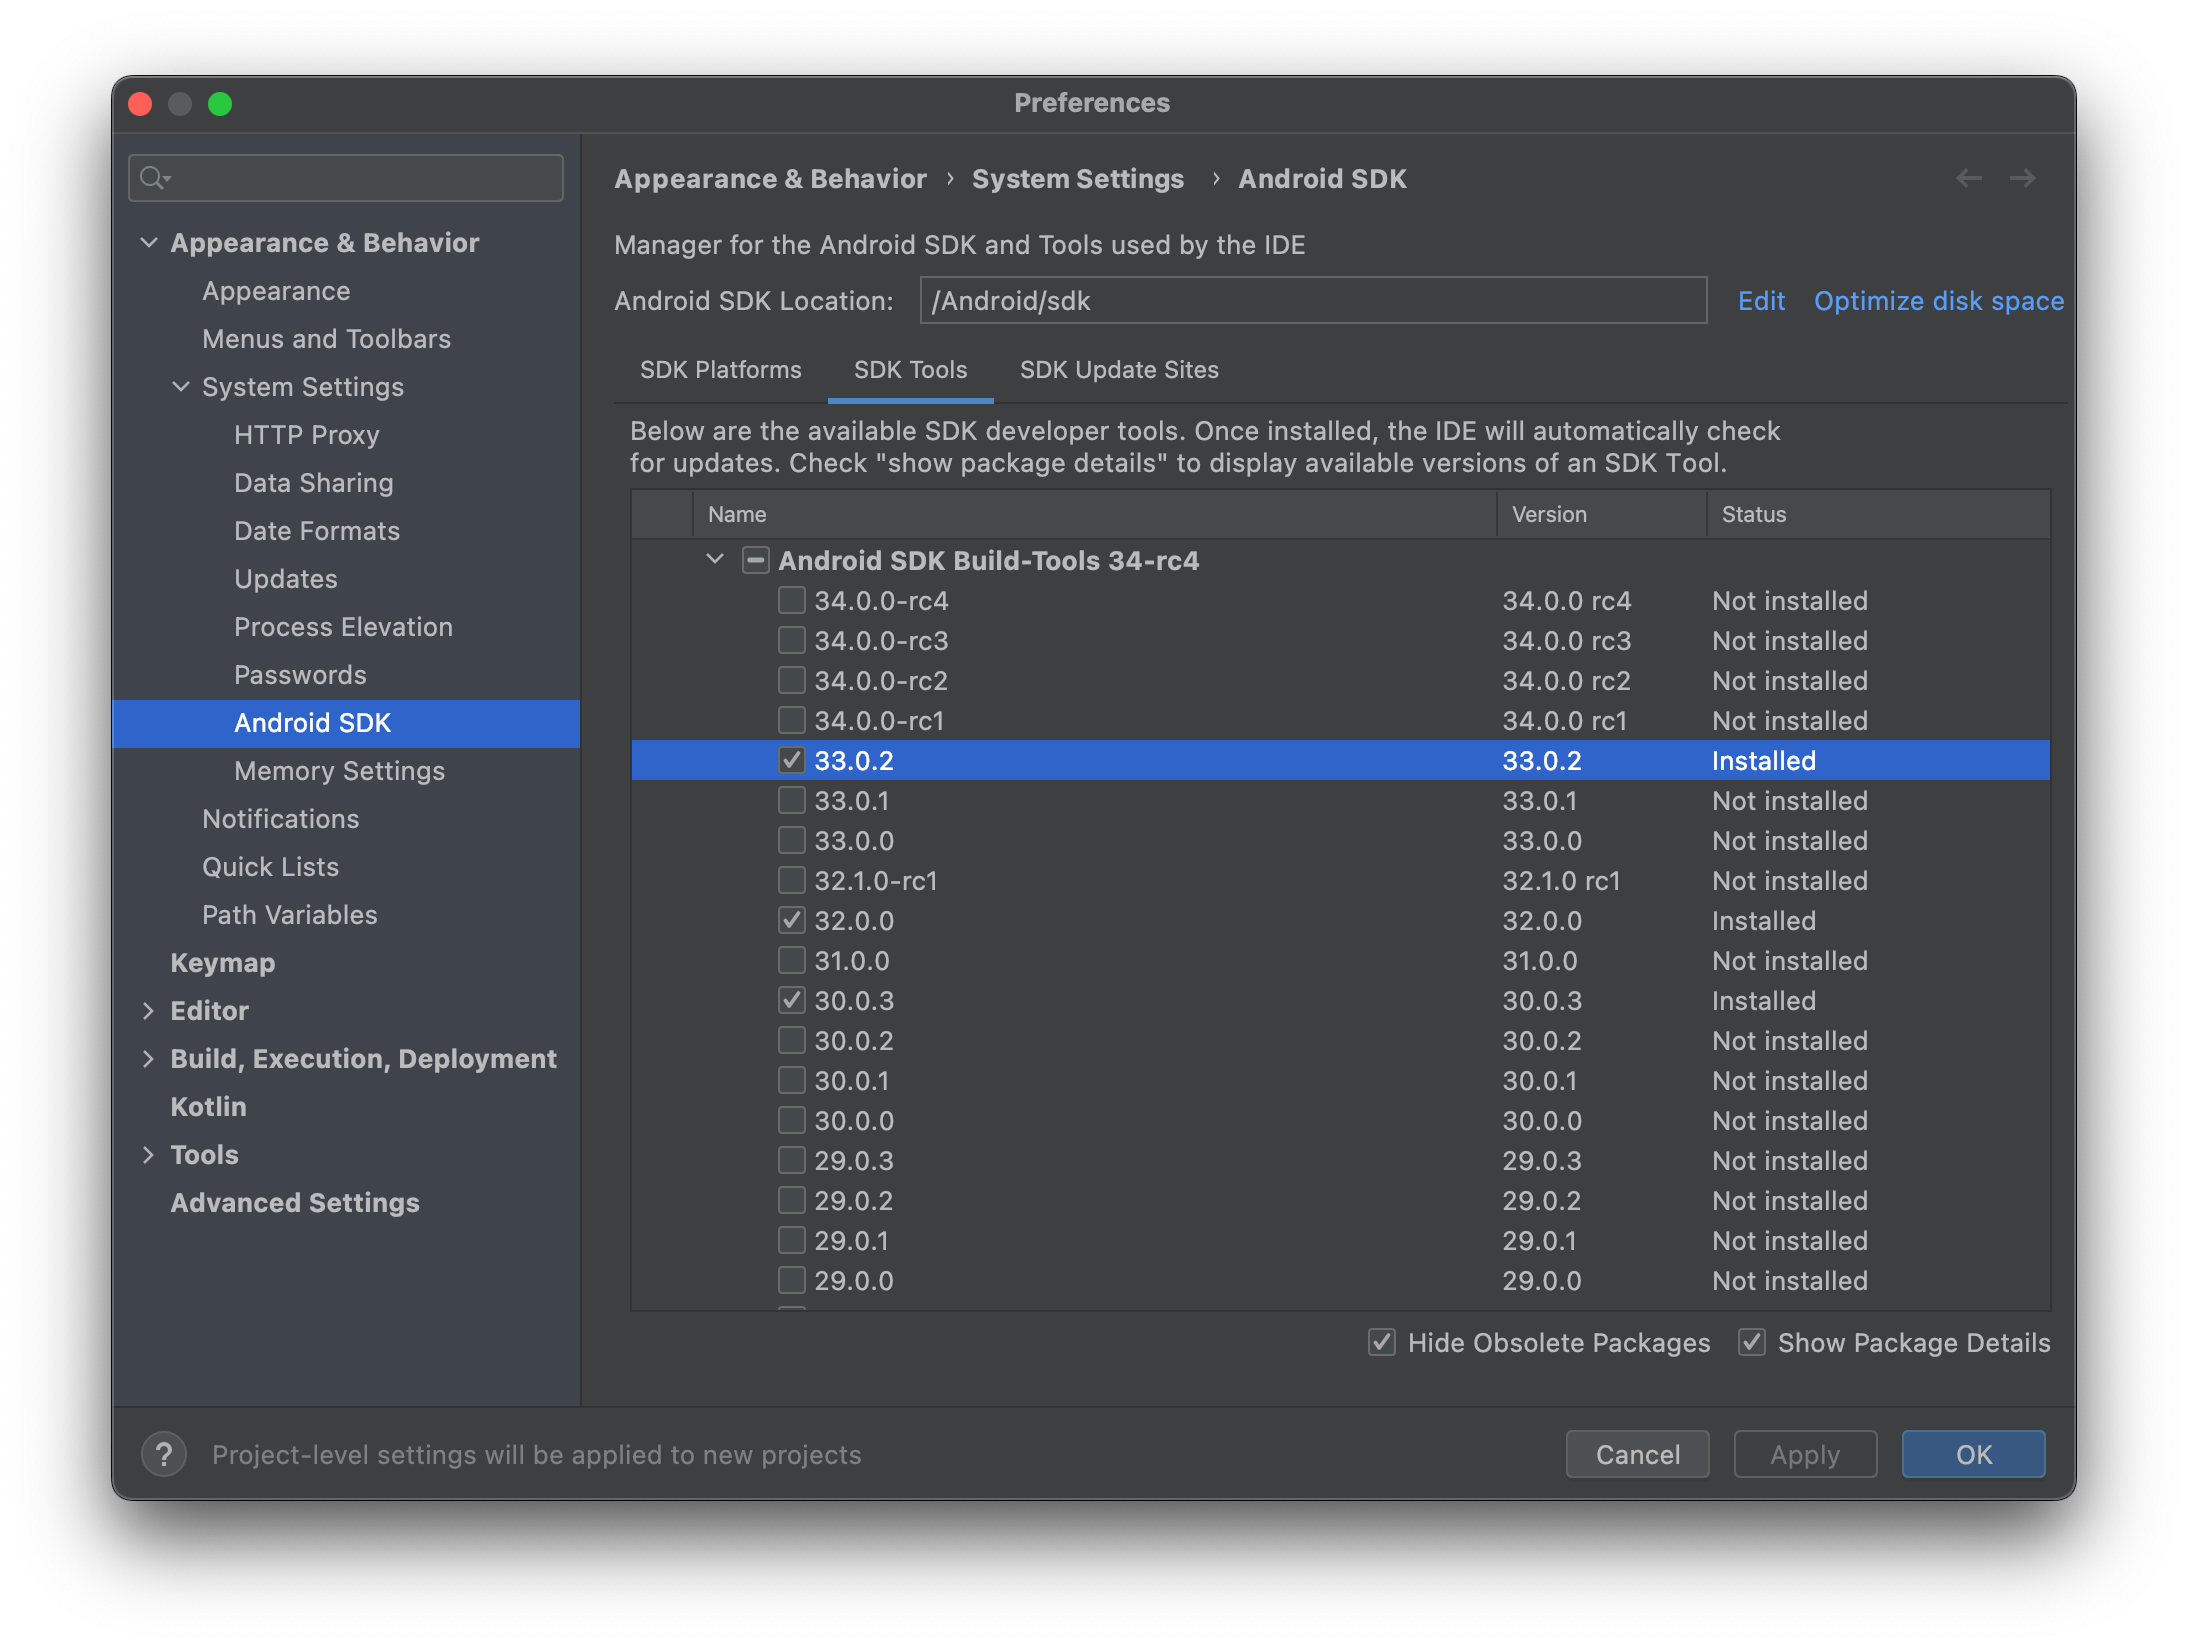
Installing Android SDK Build-Tools
- Open Android Studio's
- Open SDK Manager (
Tools > SDK Manager) - Click on the SDK Tools tab
- Check Show Package Details
- Expand Android SDK Build-Tool
- Check the highest supported Build-Tools based on the Android API Level Support.
- Click Apply
For example: If the project has installed cordova-android@12.0.0, the highest supported SDK is 33. We want to select the highest available version of 33.x. At the time of this writing, "33.0.2" should have been selected in step 6.
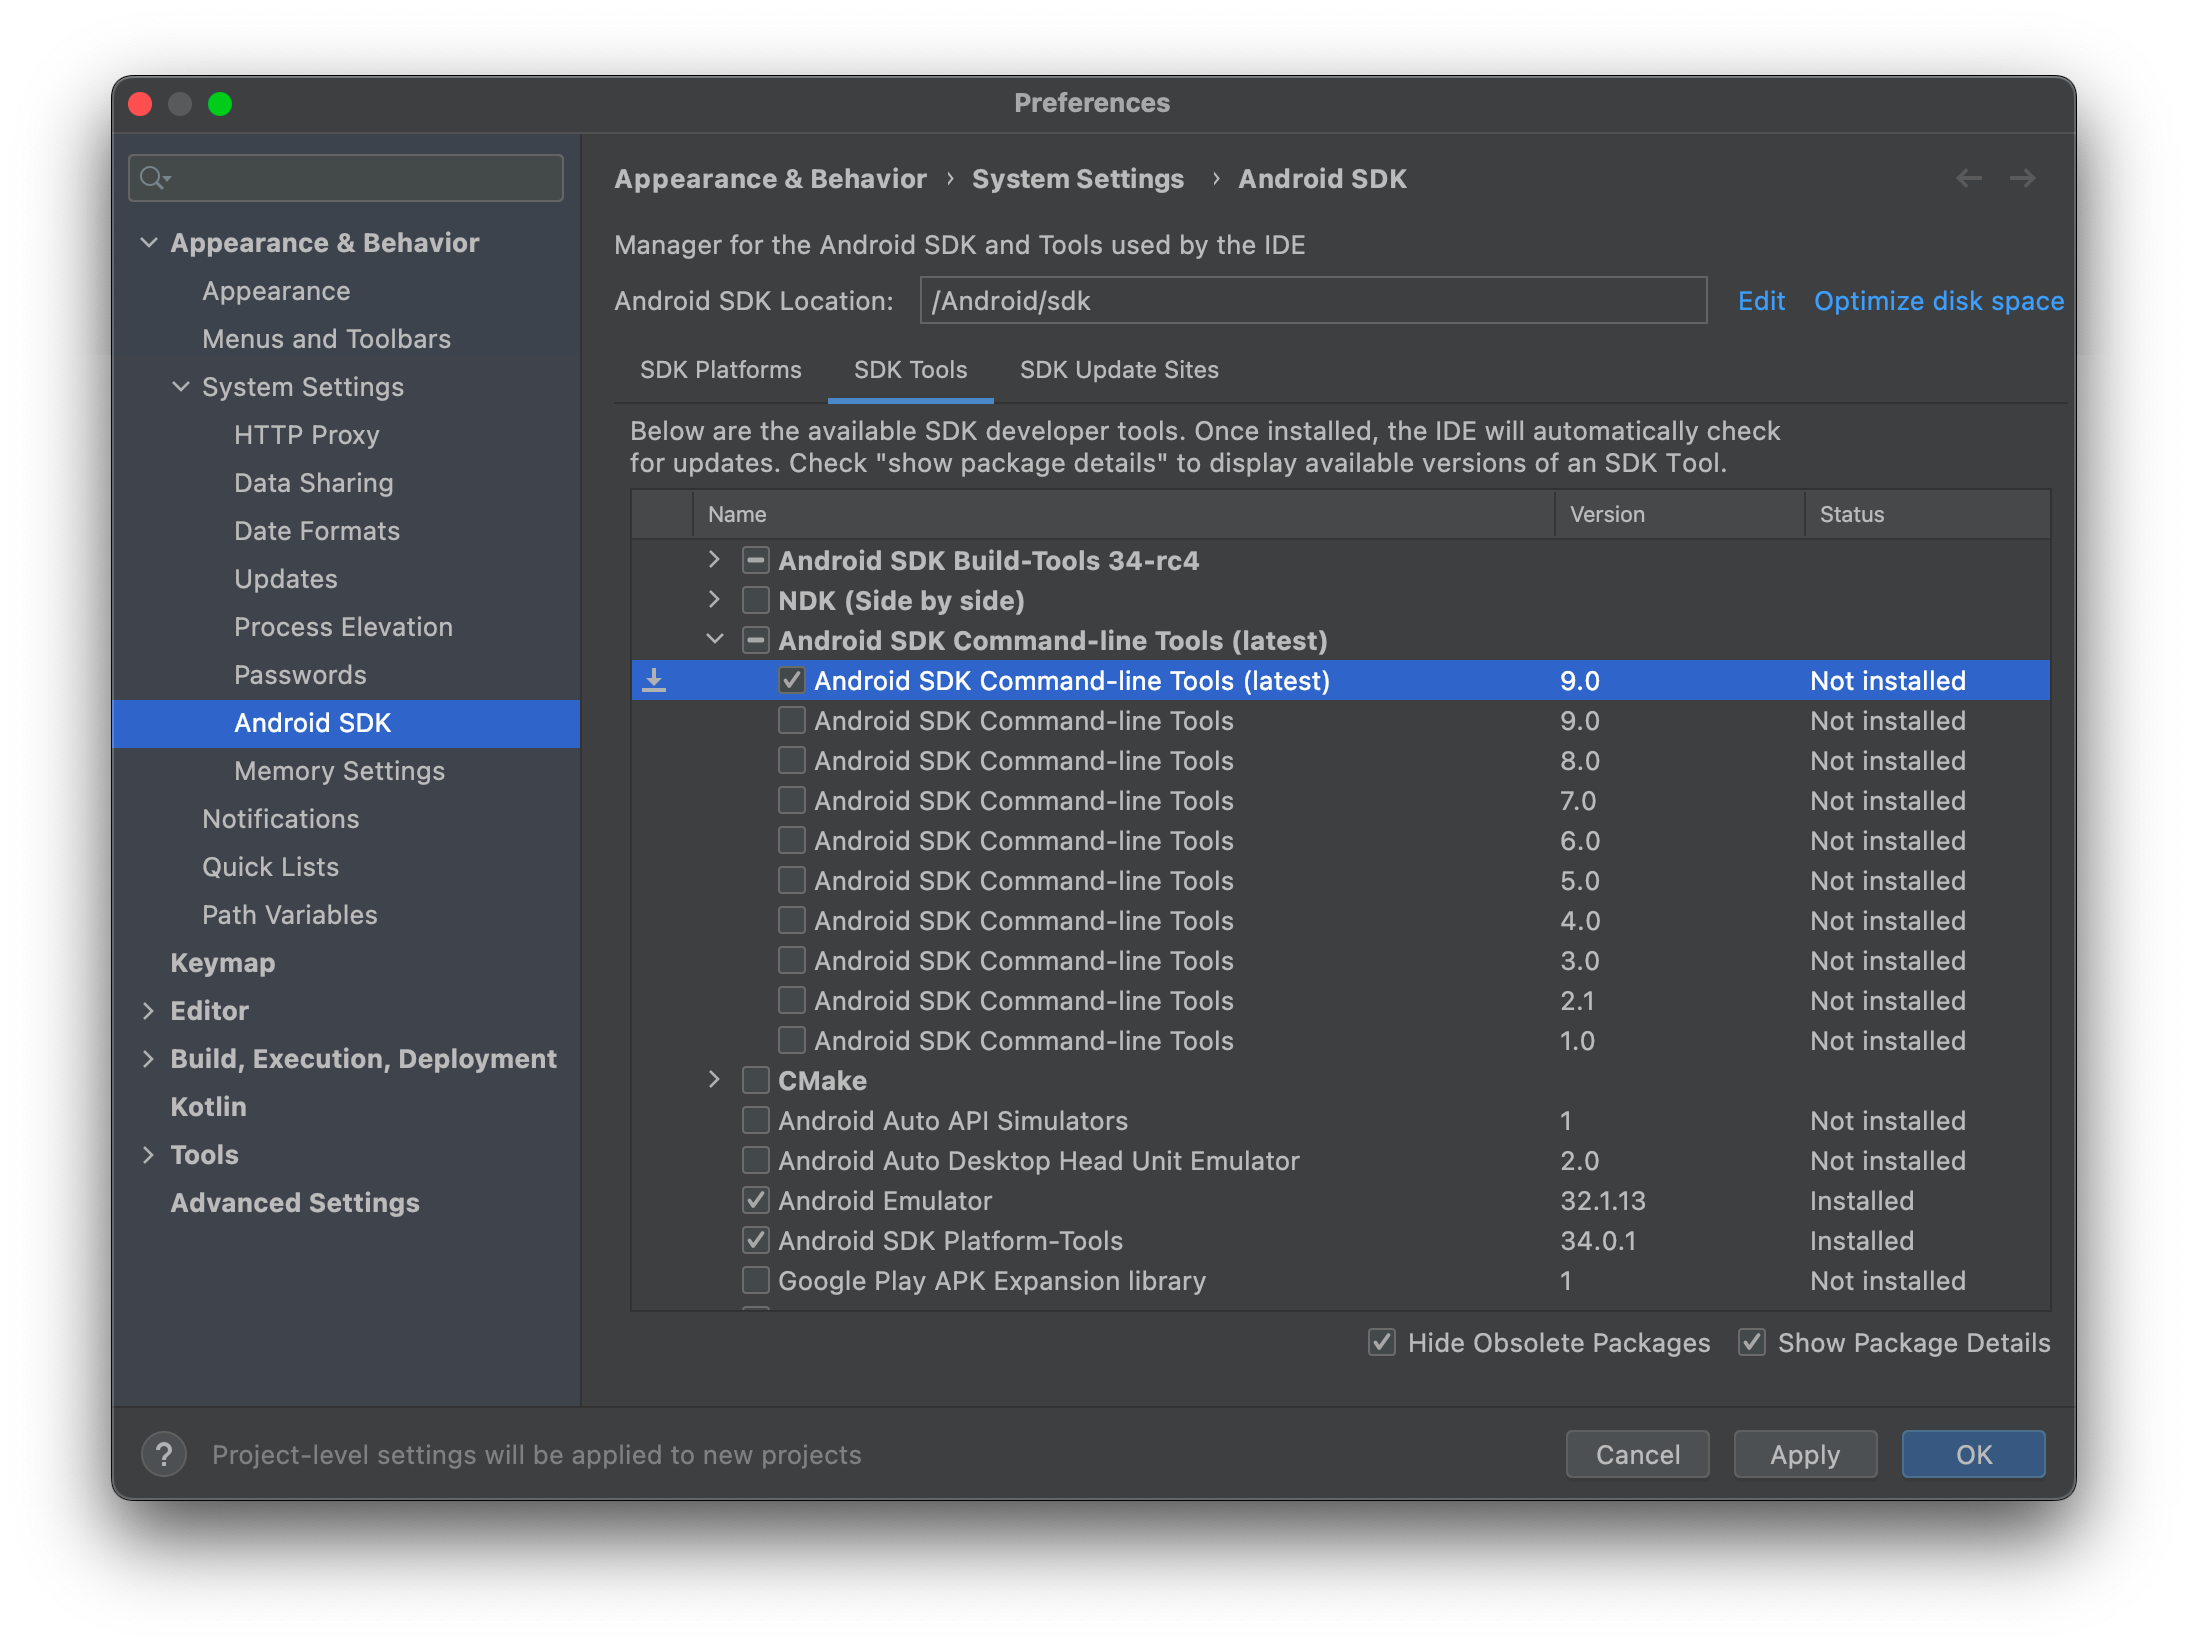
Installing SDK Command-line Tools (latest)
- Open Android Studio's
- Open SDK Manager (
Tools > SDK Manager) - Click on the SDK Tools tab
- Check Show Package Details
- Expand Android SDK Command-line Tools (latest)
- Check Android SDK Command-line Tools (latest)
- Click Apply
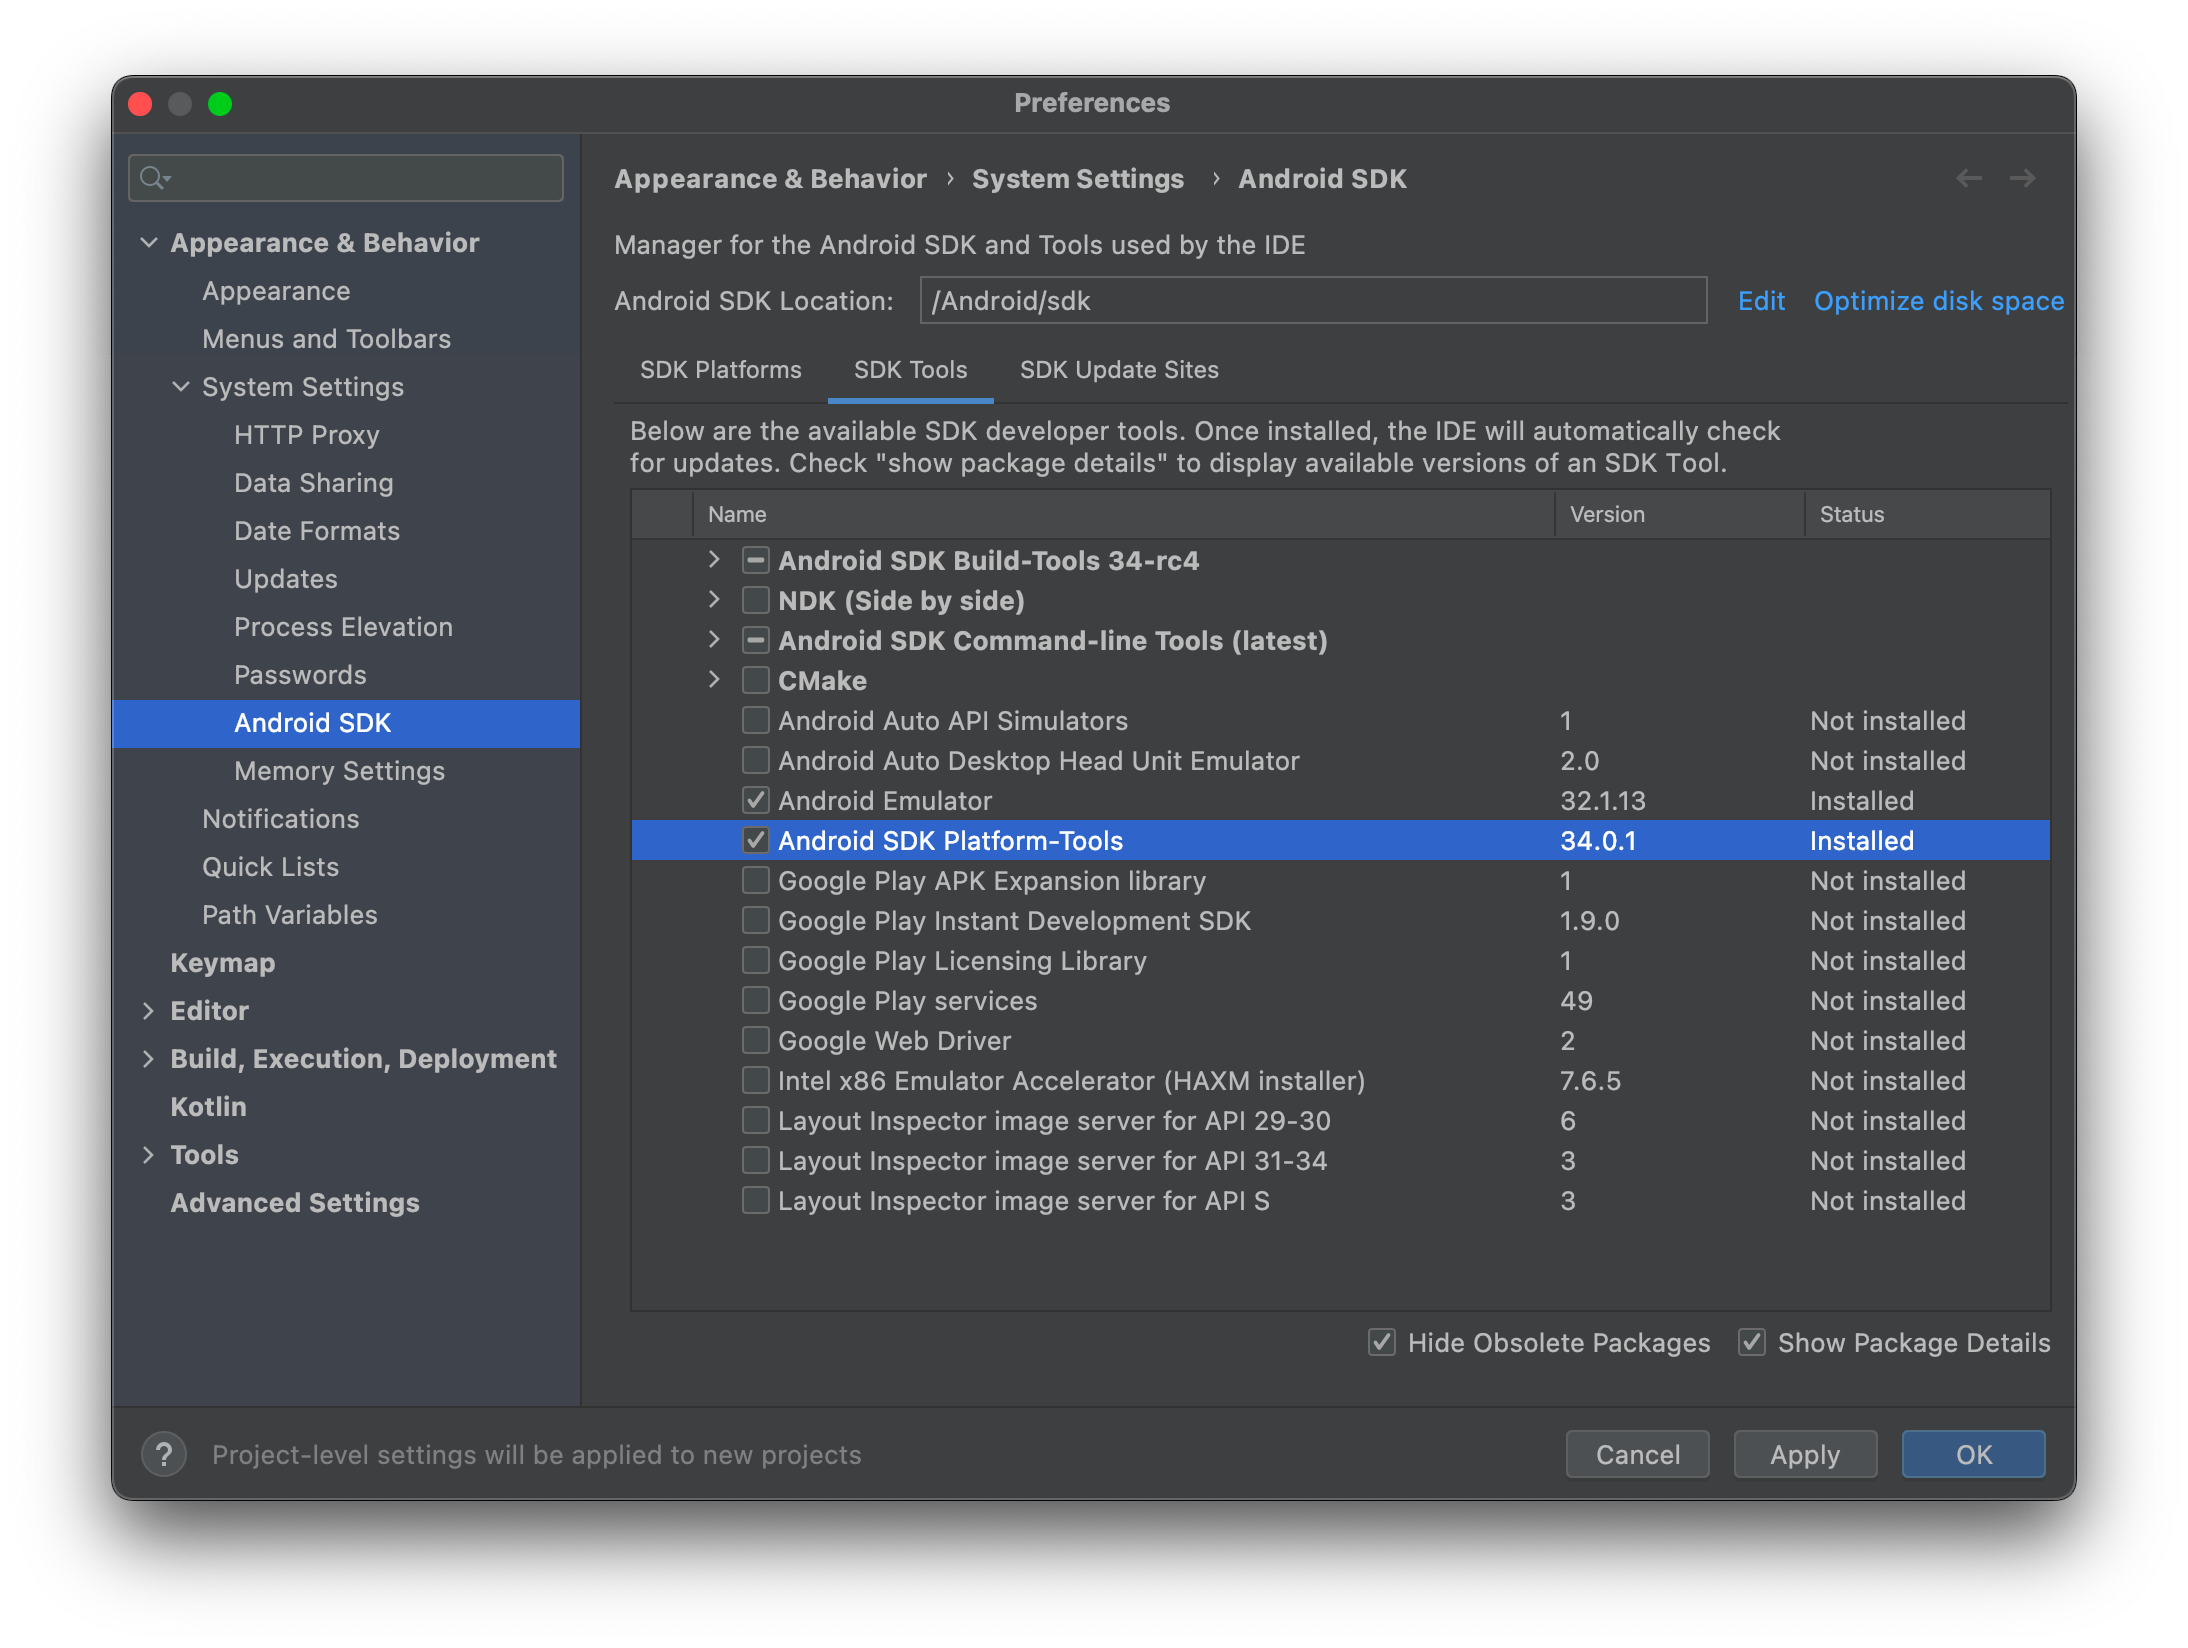
Installing Android SDK Platform-Tools
- Open Android Studio's
- Open SDK Manager (
Tools > SDK Manager) - Click on the SDK Tools tab
- Check Show Package Details
- Check Android SDK Platform-Tool
- Click Apply
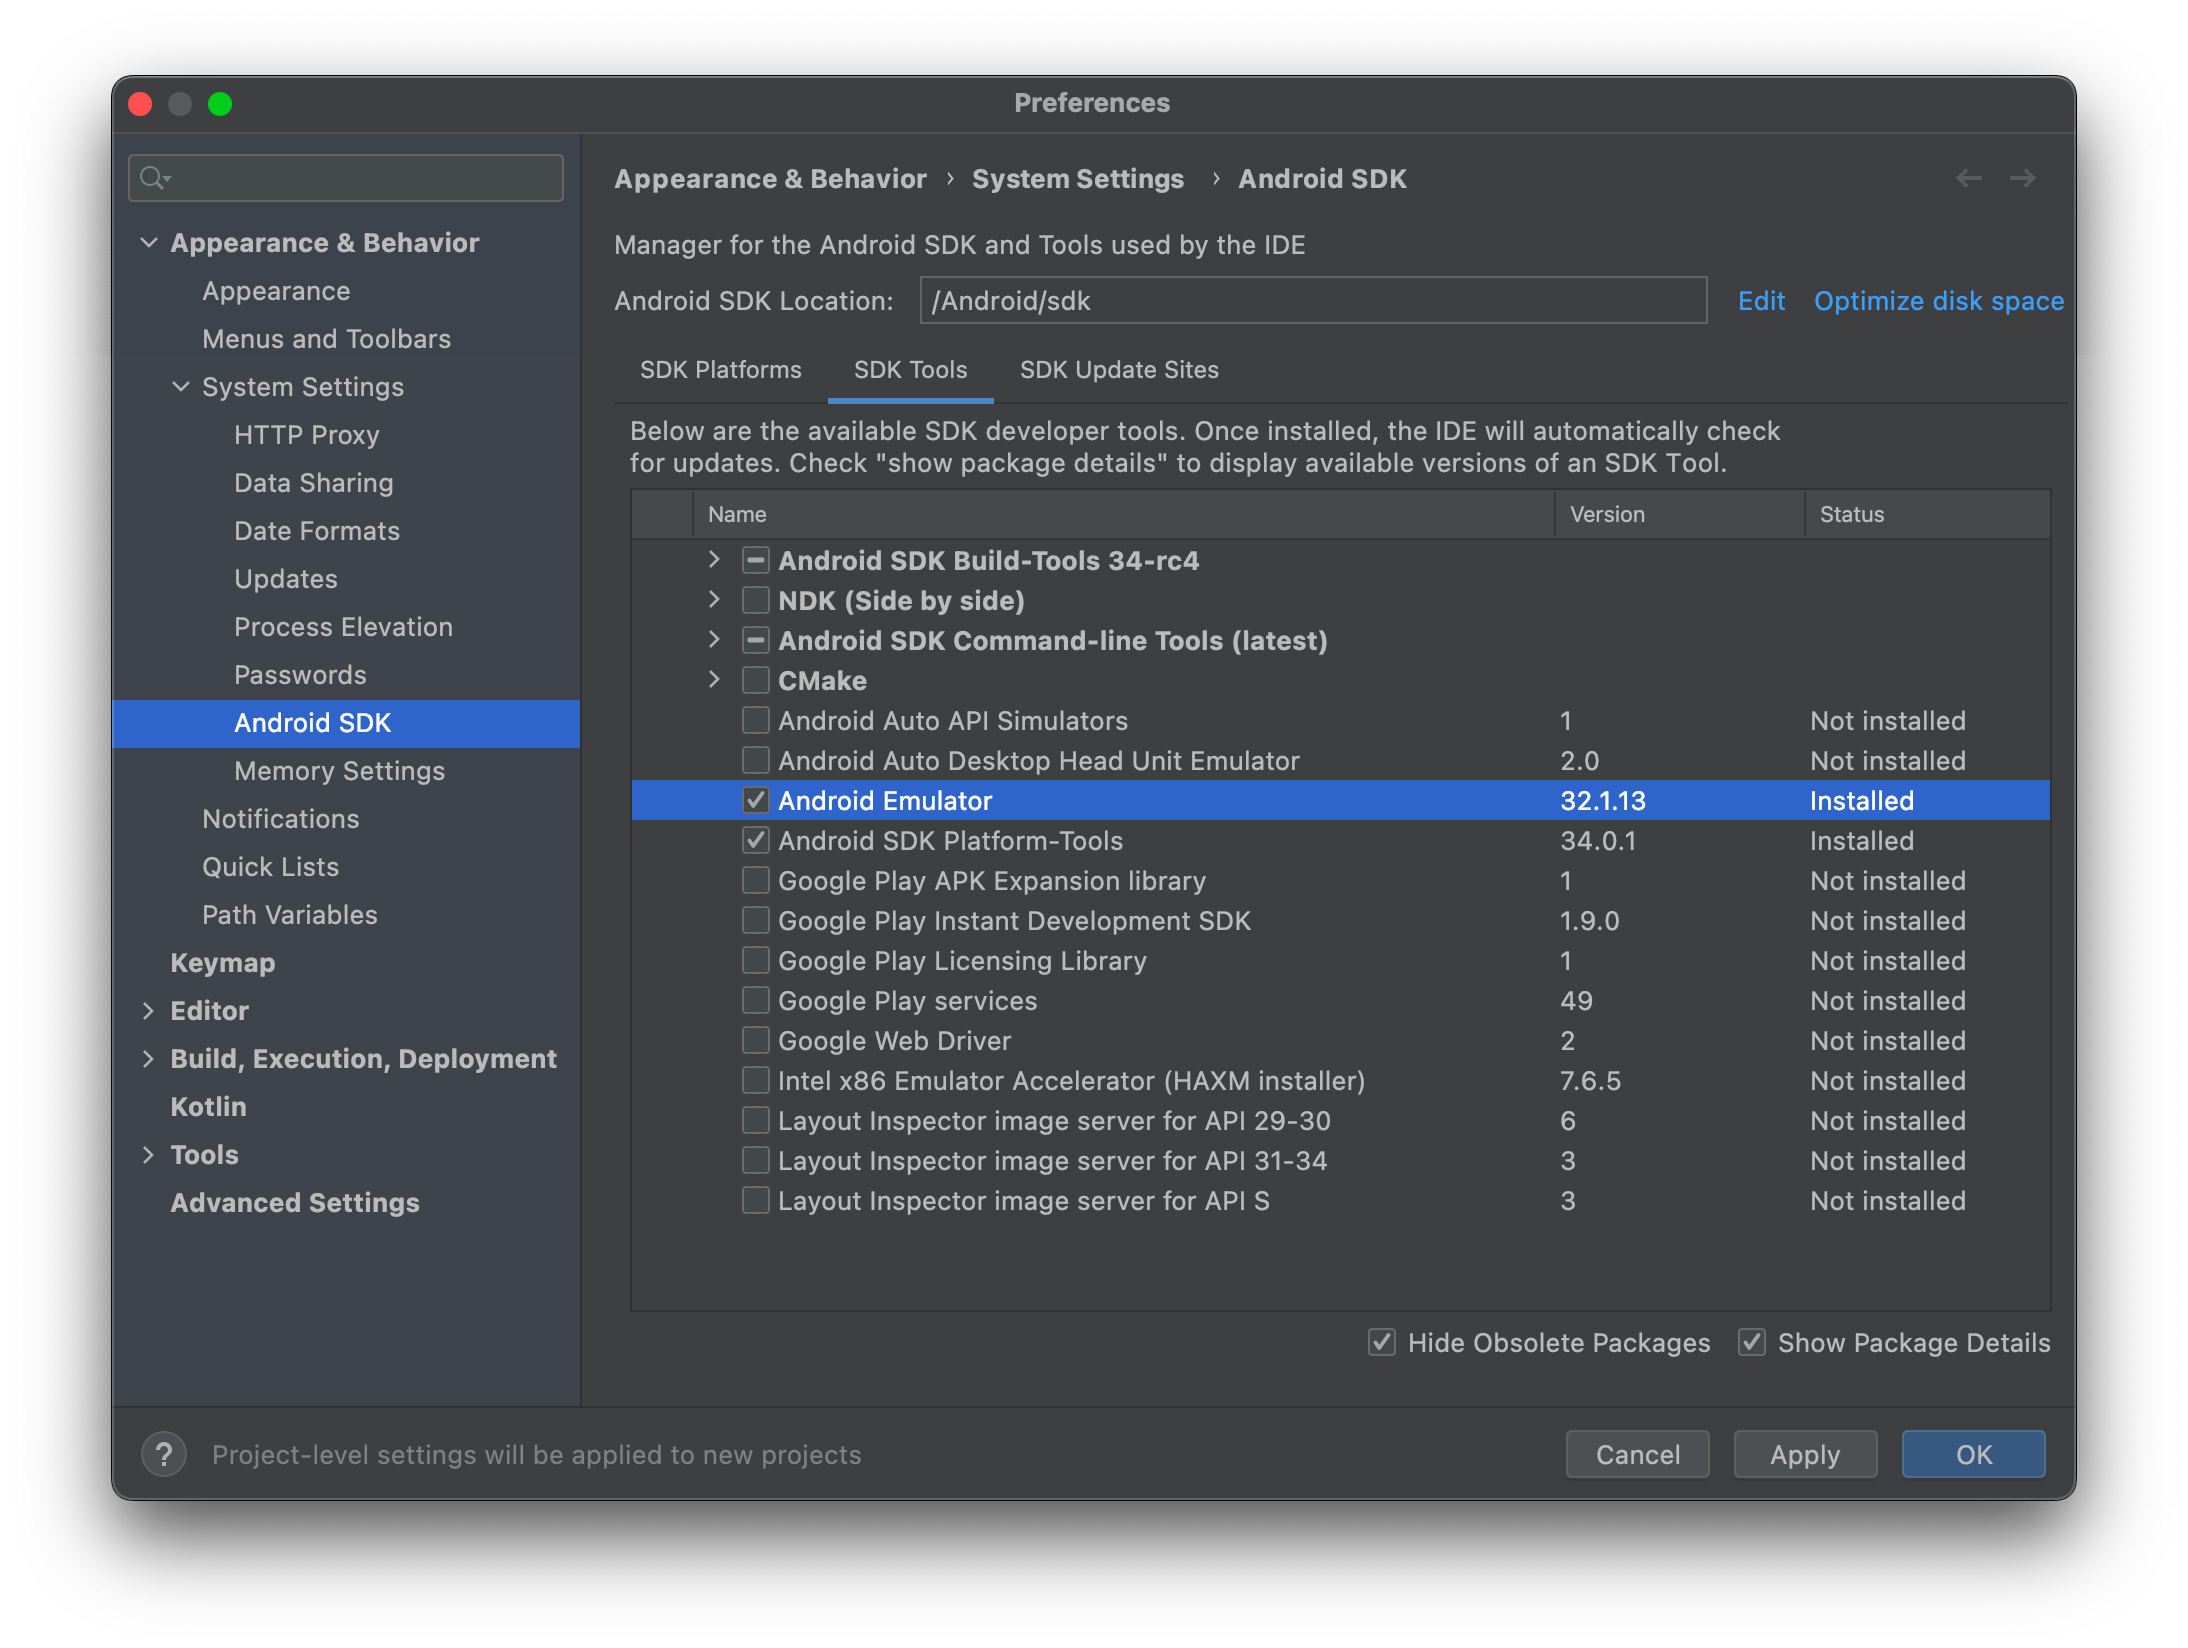
Installing Android Emulator
- Open Android Studio's
- Open SDK Manager (
Tools > SDK Manager) - Click on the SDK Tools tab
- Check Show Package Details
- Check Android Emulator
- Click Apply
Setting environment variables
Cordova's CLI requires specific environment variables so it can function correctly. If the environment variables are missing, the CLI will attempt to resolve the variable temporarily. If the missing variables fail to resolve, they must be set manually.
The following variables must be set:
JAVA_HOME- The environment variable to the location of your JDK installationANDROID_HOME- The environment variable to the location of your Android SDK installation
It is also recommended to update the PATH environment variable to include the following directories.
cmdline-tools/latest/binplatform-toolsbuild-toolsemulator- This is required for the
apksignerandzipaligntools.
- This is required for the
Note: The directories above are generally located in the Android SDK ROOT.
Linux and macOS
On Linux or macOS versions prior to Catalina, use any text editor to create or modify the ~/.bash_profile file.
On macOS Catalina and newer, create or modify the ~/.zprofile file, as the default shell has changed.
ANDROID_HOME
Add the following line to your shell's profile to set up the ANDROID_HOME environment variable.
Linux:
export ANDROID_HOME=~/Android/Sdk
macOS:
export ANDROID_HOME=~/Library/Android/sdk
The above examples point to the standard paths where the Android SDK is typically stored. Depending on your environment configuration, the path may differ. Be sure to confirm that the path exist or adjust them to match your local installation.
After setting the ANDROID_HOME environment variable, update the PATH variable to include directories containing various Android-related binaries.
export PATH=$PATH:$ANDROID_HOME/platform-tools/
export PATH=$PATH:$ANDROID_HOME/cmdline-tools/latest/bin/
export PATH=$PATH:$ANDROID_HOME/build-tools/
export PATH=$PATH:$ANDROID_HOME/emulator/
JAVA_HOME
macOS:
When you installed the Java Development Kit, as described in this guide, you can get the java home path by executing:
echo $(/usr/libexec/java_home)
Set JAVA_HOME like you already did it for ANDROID_HOME.
Reload Terminal
Reload your terminal to see this change reflected or run the following command:
Linux and macOS older then Catalina:
source ~/.bash_profile
macOS Catalina and newer:
source ~/.zprofile
Windows
These steps may vary depending on your installed version of Windows. Close and reopen any command prompt windows after making changes to see them reflected.
- Click on the Start menu or Press on the Windows Key (Win)
- Type in the search bar
Environment Variables - Select Edit the system environment variables options
- Click on the Environment Variables… button in the window that appears.
To create a new environment variable
- Click on the New… button
- Type in the Variable name
- Type in the Variable value
- Click on the OK button
To set your PATH
- Select PATH from the liste of already defined variable
- Click on the Edit… button
- Click on the New button
- Type in the relevant location.
Repeat step 3 and 4 until all paths are added.
Example paths (substitute the paths with your local Android SDK installation's location):
C:\Users\[your user]\AppData\Local\Android\Sdk\platform-tools
C:\Users\[your user]\AppData\Local\Android\Sdk\cmdline-tools\latest\bin
C:\Users\[your user]\AppData\Local\Android\Sdk\build-tools
C:\Users\[your user]\AppData\Local\Android\Sdk\emulator
Once all paths are added, click the OK button until all opened windows for setting & editing environment variables are closed.
Project Configuration
Setting up an Emulator
If you wish to run your Cordova app on an Android emulator, you will first need to create an Android Virtual Device (AVD).
See the following Android documentation for more details on:
- Create and manage virtual devices
- Run apps on the Android Emulator
- Configure hardware acceleration for the Android Emulator.
Once your AVD is configured correctly, you should be able to deploy your Cordova application to the emulator by running the following command:
cordova run --emulator
Configuring Gradle
Cordova-Android projects are built by using Gradle.
Setting Gradle Properties
It is possible to configure the Gradle build by setting the values of certain Gradle properties that Cordova exposes.
The following properties are available:
| Property | Description |
|---|---|
cdvAndroidXAppCompatVersion |
Sets the version of the androidx.appcompat:appcompat library. |
cdvAndroidXWebKitVersion |
Sets the version of the androidx.webkit:webkit library. |
cdvBuildArch |
Overrides the build architecture of which the app is built for. The default value is automatically detected by Cordova's build script. |
cdvBuildMultipleApks |
If this is set, then multiple APK files will be generated: One per native platform supported by library projects (x86, ARM, etc). This can be important if your project uses large native libraries, which can drastically increase the size of the generated APK. If not set, then a single APK will be generated which can be used on all devices |
cdvBuildToolsVersion |
Overrides the automatically detected android.buildToolsVersion value |
cdvCompileSdkVersion |
Sets the SDK version of the framework which the app is been compiled for. Setting will override the automatic detection of the android.compileSdkVersion value. |
cdvDebugSigningPropertiesFile |
Default: debug-signing.propertiesPath to a .properties file that contains signing information for debug builds (see Signing an App). Useful when you need to share a signing key with other developers |
cdvMaxSdkVersion |
set the maximum API Level which the application can run on |
cdvMinSdkVersion |
Overrides the value of minSdkVersion set in AndroidManifest.xml. Useful when creating multiple APKs based on SDK version |
cdvReleaseSigningPropertiesFile |
Default: release-signing.propertiesPath to a .properties file that contains signing information for release builds (see Signing an App) |
cdvSdkVersion |
Overrides the targetSdkVersion value. |
cdvVersionCode |
Overrides the versionCode set in AndroidManifest.xml |
cdvVersionCodeForceAbiDigit |
Whether to append a 0 "abi digit" to versionCode when only a single APK is build. |
You can set these properties in one of four ways:
-
Using an Environment Variables:
Example:
export ORG_GRADLE_PROJECT_cdvMinSdkVersion=20 cordova build android -
Using the
--gradleArgflag with the Cordovabuildorruncommand:Example:
cordova run android -- --gradleArg=-PcdvMinSdkVersion=20 -
Creating a
gradle.propertiesin the project's Android platform directoryCreate a file named
gradle.propertiesin the directory<project-root>/platforms/androidwith the contents such as:Example File Contents:
cdvMinSdkVersion=20 -
Extending
build.gradlewith thebuild-extras.gradlefileCreate a file named
build-extras.gradlein the directory<project-root>/platforms/android/appwith the contents such as:ext.cdvMinSdkVersion = 20
The latter two options both involve including an extra file in your Android platform folder. In general, it is discouraged to edit the contents of this folder because it is easy for those changes to be lost or overwritten. Instead, these files should be copied into the folder as part of the build command by using the before_build hook script.
Extending build.gradle
To customize the app/build.gradle file without modifying it directly, create a sibling file named build-extras.gradle.
If this file exists in the <your-project>/platforms/android/app directory during the build process, it will be automatically applied by the app's build.gradle script.
To automate placing build-extras.gradle in the correct location, use the <resource-file> element in config.xml.
In the example below, the source build-extras.gradle is saved in a res/ directory in the project root. It is then declared in config.xml to copy it to the appropriate target location:
<resource-file src="res/build-extras.gradle" target="app/build-extras.gradle"/>
Note: The res/ directory name is just an example. You can use any directory and file name you prefer. However, it's recommended not to place the file inside the platforms, plugins, or www directories. Also, make sure the target path matches exactly as shown in the example.
Note: Plugin developers can also include a build-extras.gradle file, but should use the <framework> element in plugin.xml instead of <resource-file>:
<framework src="build-extras.gradle" custom="true" type="gradleReference" />
Example build-extras.gradle:
// This file is included at the beginning of `build.gradle`

// special properties (see `build.gradle`) can be set and overwrite the defaults
ext.cdvDebugSigningPropertiesFile = '../../android-debug-keys.properties'

// normal `build.gradle` configuration can happen
android {
  defaultConfig {
    testInstrumentationRunner 'android.support.test.runner.AndroidJUnitRunner'
  }
}
dependencies {
  androidTestImplementation 'com.android.support.test.espresso:espresso-core:2.2.2', {
    exclude group: 'com.android.support', module: 'support-annotations'
  }
}

// When set, this function `ext.postBuildExtras` allows code to run at the end of `build.gradle`
ext.postBuildExtras = {
    android.buildTypes.debug.applicationIdSuffix = '.debug'
}
Configuring Gradle JVM Args
To change the Gradle JVM args, the --jvmargs flag can be used with both Cordova's build and run commands. This is mostly useful for controlling how much memory gradle is allowed to use during the build process. It is recommended to allow at least 2048 MB.
By default, JVM args has a value of -Xmx2048m. To increase the maximum allowed memory, use the -Xmx JVM arg. Example given below:
cordova build android -- --jvmargs='-Xmx4g'
The following units are supported:
| unit | value | example |
|---|---|---|
| kilobyte | k | -Xmx2097152k |
| megabyte | m | -Xmx2048m |
| gigabyte | g | -Xmx2g |
Setting the Version Code
To change the version code for your app's generated apk, set the android-versionCode attribute in the widget element of your application's config.xml file.
If the android-versionCode is not set, the version code will be determined using the version attribute. For example, if the version is MAJOR.MINOR.PATCH:
versionCode = MAJOR * 10000 + MINOR * 100 + PATCH
If your application has enabled the cdvBuildMultipleApks Gradle property (see Setting Gradle Properties), the version code of your app will also be multiplied by 10 so that the last digit of the code can be used to indicate the architecture the apk was built for. This multiplication
will happen regardless of whether the version code is taken from the android-versionCode attribute or generated using the version.
Note: Be aware that some plugins added to your project may set this Gradle property automatically.
Note: When updating the android-versionCode property, it is not recommended to increment the version code taken from built apks. It is recommended to increment the code based off the value in your config.xml file's android-versionCode attribute. This is because the cdvBuildMultipleApks property causes the version code to be multiplied by 10 in the built apks and thus using that value will cause your next version code to be 100 times the original, etc.
Signing an App
It is recommended to read Android's documentation for Sign your app first, as it contains the necessary steps in creating required files for signing.
Using Flags
To sign an app, you need the following parameters:
| Parameter | Flag | Description |
|---|---|---|
| Keystore | --keystore |
Path to a binary file which can hold a set of keys |
| Keystore Password | --storePassword |
Password to the keystore |
| Alias | --alias |
The id specifying the private key used for signing |
| Password | --password |
Password for the private key specified |
| Type of the Keystore | --keystoreType |
Default: auto-detect based on file extension Either pkcs12 or jks |
| Package Type | --packageType |
Default: apk for debug, bundle for release Specify whether to build an APK or an AAB (Android App Bundle) file. Acceptable Values: apk or bundle |
The parameters above can be specified as an argument when using the Cordova CLI build or run commands.
Note: You should use double -- to indicate that these are platform-specific arguments.
Example:
cordova run android --release -- --keystore=../my-release-key.keystore --storePassword=password --alias=alias_name --password=password --packageType=bundle.
Using build.json
Alternatively, you could specify the signing parameters in a build configuration file (build.json).
By default, if the build.json file exists in the project's root directory, it will automatically be detected and used. If the file is not located in the project's root directory or has multiple configuration files, the command line argument --buildConfig must be supplied with the path to the file.
Example build.json configuration file:
{
    "android": {
        "debug": {
            "keystore": "../android.keystore",
            "storePassword": "android",
            "alias": "mykey1",
            "password" : "password",
            "keystoreType": "",
            "packageType": "apk"
        },
        "release": {
            "keystore": "../android.keystore",
            "storePassword": "",
            "alias": "mykey2",
            "password" : "password",
            "keystoreType": "",
            "packageType": "bundle"
        }
    }
}
There is also support to mix and match command line arguments and parameters in build.json. Values from the command line arguments takes precedence. This can be useful for specifying passwords on the command line.
Using Gradle
You can also specify signing properties by including a .properties file and pointing to it with the cdvReleaseSigningPropertiesFile and cdvDebugSigningPropertiesFile Gradle properties (see Setting Gradle Properties).
Example file content:
storeFile=relative/path/to/keystore.p12
storePassword=SECRET1
storeType=pkcs12
keyAlias=DebugSigningKey
keyPassword=SECRET2
The storePassword and keyPassword properties are required for automated signing.
Debugging
For details on the debugging tools that come packaged with the Android SDK, see Android's developer documentation for debugging. Additionally, Android's developer documentation for debugging web apps provides an introduction for debugging the portion of your app running in the Webview.
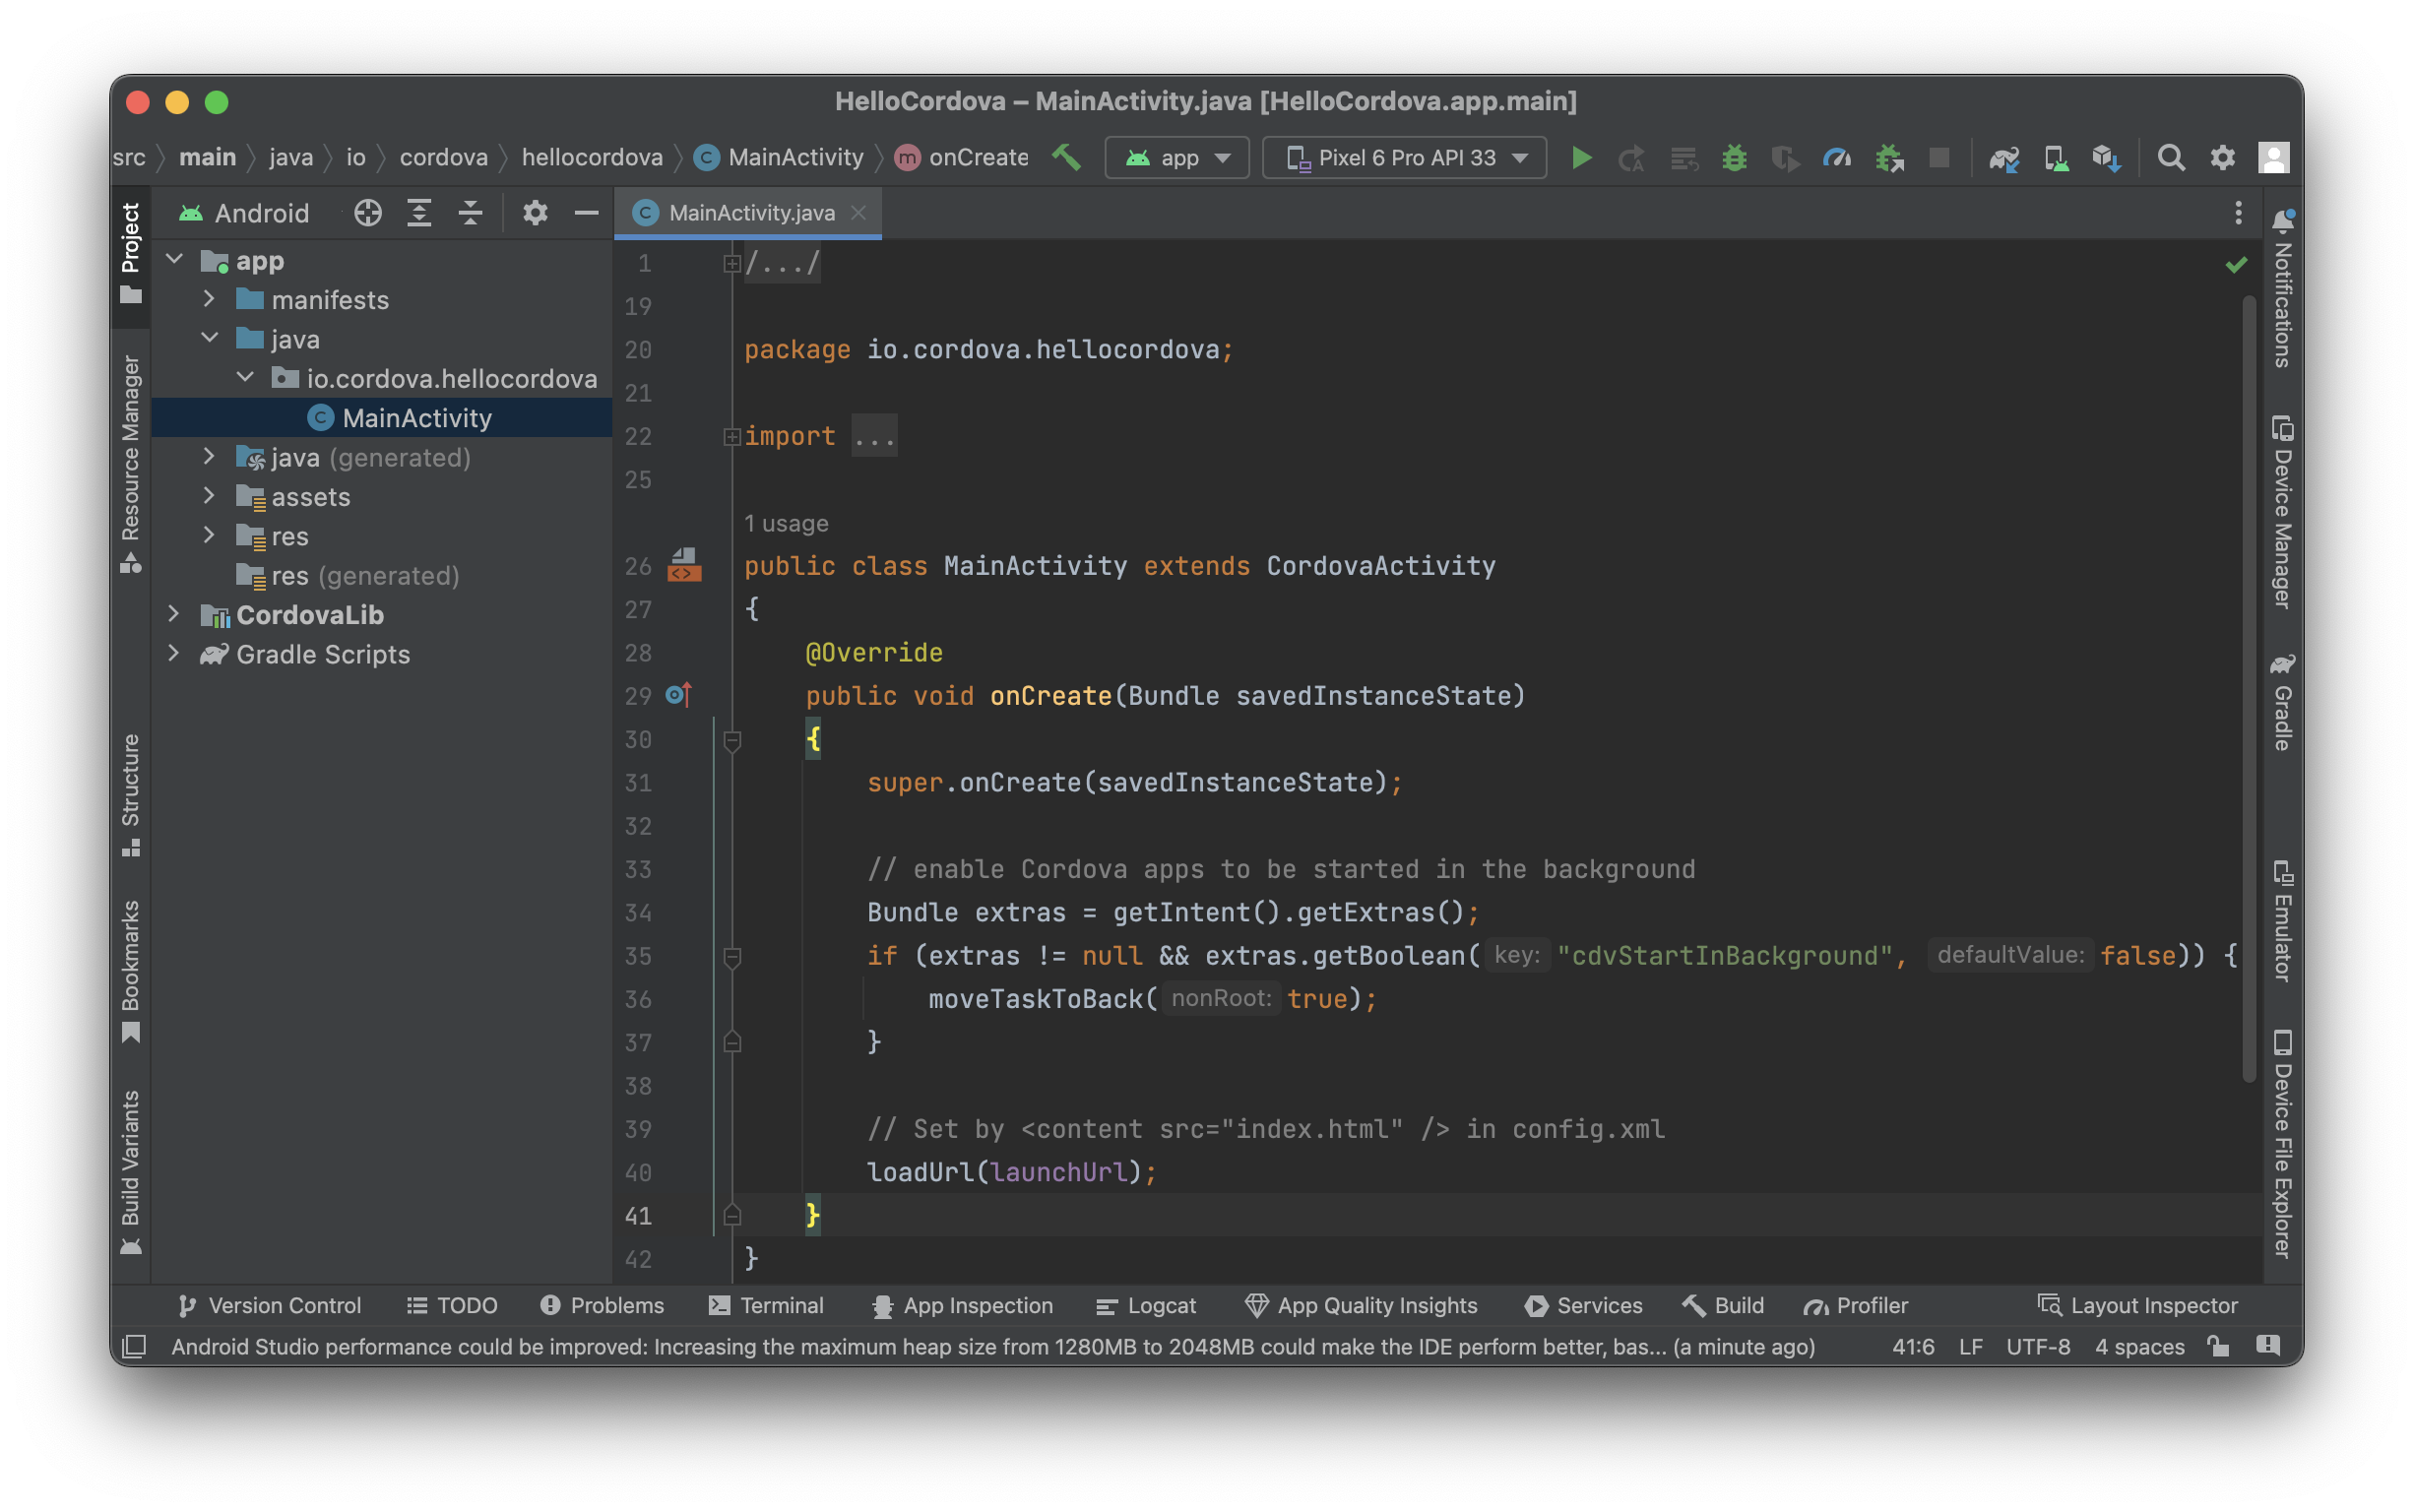
Opening a Project in Android Studio
Cordova-Android projects can be opened in Android Studio. This can be useful if you wish to use Android Studio's built in Android debugging and profiling tools or if you are developing Android plugins.
Note: When opening your project in Android Studio, it is recommended to NOT edit the code within the IDE. Editing in Android Studio will edit code residing in the platforms directory of your project. It is not updating the code in the projects root www)directory. The changes are liable to be overwritten. Instead, edit the www folder and copy over your changes by running cordova prepare.
Plugin developers wishing to edit their native code in Android Studio should use the --link flag when adding their plugin to the project with the cordova plugin add. This will create a symbolic link of the plugin files from the plugin source directory to the project's platforms directory.
To open a Cordova-Android project in Android Studio:
- Launch Android Studio
- Click the Open button
- Navigate to the project's Android platform directory: (
<project-root>/platforms/android) - Click Open
Once it finishes importing, you should be able to build and run the app directly from Android Studio.
For more resources, please see:
Upgrading
Refer to this article for instructions to upgrade your cordova-android version.
Lifecycle Guide
Cordova and Android
Native Android apps typically consist of a series of activities that the user interacts with. Activities can be thought of as the individual screens that make up an application; different tasks in an app will often have their own activity. Each activity has its own lifecycle that is maintained as the activity enters and leaves the foreground of a user's device.
In contrast, Cordova applications on the Android platform are executed within a Webview that is embedded in a single Android activity. The lifecycle of this activity is exposed to your application through the document events that are fired. The events are not guaranteed to line up with Android's lifecycle, but they can provide guidelines for saving and restoring your state. These events roughly map to Android callbacks as follows:
| Cordova Event | Rough Android Equivalent | Meaning |
|---|---|---|
deviceready |
onCreate() |
Application is starting (not from background) |
pause |
onPause() |
Application is moving to the background |
resume |
onResume() |
Application is returning to the foreground |
Most other Cordova platforms have a similar concept of lifecycles and should fire these same events when similar actions happen on a user's device. However, Android presents some unique challenges that can sometimes show up thanks to the native Activity lifecycle.
What makes Android different?
In Android, the OS can choose to kill activities in the background in order to free up resources if the device is low on memory. Unfortunately, when the activity holding your application is killed, the Webview in which your application lives will be destroyed as well. Any state that your application is maintaining will be lost in this case. When the user navigates back to your application, the Activity and Webview will be recreated by the OS, but state will not be automatically restored for your Cordova app. For this reason, it is imperative that your application be aware of the lifecycle events that are fired and maintain whatever state is appropriate to make sure a user's context in your app is not lost when they leave the application.
When can this happen?
Your application is susceptible to being destroyed by the OS whenever it leaves the sight of the user. There are two main situations in which this can occur. The first and most obvious case is when the user presses the home button or switches to another application.
However, there is a second (and much more subtle) case that certain plugins can introduce. As noted above, Cordova applications are usually confined to the single activity that contains the Webview. However, there are instances in which other activities may be launched by plugins and temporarily push the Cordova activity to the background. These other Activities are typically launched in order to perform a specific task using a native application installed on the device. For example, the Cordova camera plugin launches whatever camera activity is natively installed on the device in order to take a photo. Reusing the installed camera application in this way makes your application feel much more like a native app when the user tries to take a photo. Unfortunately, when the native Activity pushes your app to the background there is a chance the OS will kill it.
For a clearer understanding of this second case, let's walk through an example using the camera plugin. Imagine you have an application that requires the user to take a profile photo. The flow of events in the application when everything goes as planned will look something like this:
- The user is interacting with your app and needs to take a picture
- The camera plugin launches the native camera activity
- The Cordova activity is pushed to the background (pause event is fired)
- The user takes a photo
- The camera activity finishes
- The Cordova activity is moved to the foreground (resume event is fired)
- The user is returned to your application where they left off
However, this flow of events can be disrupted if a device is low on memory. If the Activity is killed by the OS, the above sequence of events instead plays out as follows:
- The user is interacting with your app and needs to take a picture
- The camera plugin launches the native camera activity
- The OS destroys the Cordova activity (pause event is fired)
- The user takes a photo
- The camera activity finishes
- The OS recreates the Cordova activity (deviceready and resume events are fired)
- The user is confused as to why they are suddenly back at your app's login screen
In this instance, the OS killed the application in the background and the application did not maintain its state as part of the lifecycle. When the user returned to the app, the Webview was recreated and the app appeared to have restarted from scratch (hence the user's confusion). This sequence of events is equivalent to what happens when the home button is pressed or the user switches applications. The key to preventing the above experience is subscribing to events and properly maintaining state as part of the activity lifecycle.
Respecting the Lifecycle
In the examples above, the javascript events that are fired are noted in italics. These events are your opportunity to save and restore your
application's state. You should register callbacks in your application's bindEvents function that respond to the lifecycle events by saving state. What information you save and how you save it is left to your discretion, but you should be sure to save enough information so that you can restore the user to exactly where they left off when they return to your application.
There is one additional factor in the example above that only applies in the second-discussed situation (i.e. when a plugin launches an external activity). Not only was the state of the application lost when the user finished taking a photo, but so was the photo that the user took. Normally, that photo would be delivered to your application through the callback that was registered with the camera plugin. However, when the Webview was destroyed that callback was lost forever. Luckily, cordova-android 5.1.0 and above provide a means for getting the result of that plugin call when your application resumes.
Retrieving plugin callback results (cordova-android 5.1.0+)
When the OS destroys the Cordova activity that was pushed into the background by a plugin, any pending callbacks are lost as well. This means that if you passed a callback to the plugin that launched the new activity (e.g. the camera plugin), that callback will NOT be fired when the application is recreated. However, starting in cordova-android 5.1.0, the resume event's payload will contain any pending plugin results from the plugin request that launched the external activity made prior to the activity being destroyed.
The payload for the resume event adheres to the following format:
{
    action: "resume",
    pendingResult: {
        pluginServiceName: string,
        pluginStatus: string,
        result: any
    }
}
The fields of that payload are defined as follows:
pluginServiceName: The name of the plugin returning the result (e.g. "Camera"). This can be found in the<name>tag of a plugin's plugin.xml filepluginStatus: The status of the plugin call (see below)result: Whatever the result of the plugin call is
The possible values for pluginStatus in the pendingResult field include the following:
"OK"- The plugin call was successful"No Result"- The plugin call ended with no result"Error"- The plugin call resulted in some general error- Other miscellaneous errors
"Class not found""Illegal access""Instantiation error""Malformed url""IO error""Invalid action""JSON error"
Note: It is up to the plugin to decide what is contained in the result field and the meaning of the pluginStatus that is returned. Refer to the plugin's API documentationf or the expect results and how to use the values.
Example
Below is a brief example application that uses the resume and pause events to manage state. It uses the Apache camera plugin as an example of how to retrieve the results of a plugin call from the resume event payload. The portion of the code dealing with the resume's event.pendingResult object requires cordova-android 5.1.0+
// This state represents the state of our application and will be saved and
// restored by onResume() and onPause()
var appState = {
    takingPicture: true,
    imageUri: ""
};

var APP_STORAGE_KEY = "exampleAppState";

var app = {
    initialize: function() {
        this.bindEvents();
    },
    bindEvents: function() {
        // Here we register our callbacks for the lifecycle events we care about
        document.addEventListener('deviceready', this.onDeviceReady, false);
        document.addEventListener('pause', this.onPause, false);
        document.addEventListener('resume', this.onResume, false);
    },
    onDeviceReady: function() {
        document.getElementById("take-picture-button").addEventListener("click", function() {
            // Because the camera plugin method launches an external Activity,
            // there is a chance that our application will be killed before the
            // success or failure callbacks are called. See onPause() and
            // onResume() where we save and restore our state to handle this case
            appState.takingPicture = true;

            navigator.camera.getPicture(cameraSuccessCallback, cameraFailureCallback,
                {
                    sourceType: Camera.PictureSourceType.CAMERA,
                    destinationType: Camera.DestinationType.FILE_URI,
                    targetWidth: 250,
                    targetHeight: 250
                }
            );
        });
    },
    onPause: function() {
        // Here, we check to see if we are in the middle of taking a picture. If
        // so, we want to save our state so that we can properly retrieve the
        // plugin result in onResume(). We also save if we have already fetched
        // an image URI
        if(appState.takingPicture || appState.imageUri) {
            window.localStorage.setItem(APP_STORAGE_KEY, JSON.stringify(appState));
        }
    },
    onResume: function(event) {
        // Here we check for stored state and restore it if necessary. In your
        // application, it's up to you to keep track of where any pending plugin
        // results are coming from (i.e. what part of your code made the call)
        // and what arguments you provided to the plugin if relevant
        var storedState = window.localStorage.getItem(APP_STORAGE_KEY);

        if(storedState) {
            appState = JSON.parse(storedState);
        }

        // Check to see if we need to restore an image we took
        if(!appState.takingPicture && appState.imageUri) {
            document.getElementById("get-picture-result").src = appState.imageUri;
        }
        // Now we can check if there is a plugin result in the event object.
        // This requires cordova-android 5.1.0+
        else if(appState.takingPicture && event.pendingResult) {
            // Figure out whether or not the plugin call was successful and call
            // the relevant callback. For the camera plugin, "OK" means a
            // successful result and all other statuses mean error
            if(event.pendingResult.pluginStatus === "OK") {
                // The camera plugin places the same result in the resume object
                // as it passes to the success callback passed to getPicture(),
                // thus we can pass it to the same callback. Other plugins may
                // return something else. Consult the documentation for
                // whatever plugin you are using to learn how to interpret the
                // result field
                cameraSuccessCallback(event.pendingResult.result);
            } else {
                cameraFailureCallback(event.pendingResult.result);
            }
        }
    }
}

// Here are the callbacks we pass to getPicture()
function cameraSuccessCallback(imageUri) {
    appState.takingPicture = false;
    appState.imageUri = imageUri;
    document.getElementById("get-picture-result").src = imageUri;
}

function cameraFailureCallback(error) {
    appState.takingPicture = false;
    console.log(error);
}

app.initialize();
The corresponding html:
<!DOCTYPE html>

<html>
    <head>
        <meta http-equiv="Content-Security-Policy" content="default-src 'self' data: gap: https://ssl.gstatic.com 'unsafe-eval'; style-src 'self' 'unsafe-inline'; media-src *">
        <meta name="format-detection" content="telephone=no">
        <meta name="msapplication-tap-highlight" content="no">
        <meta name="viewport" content="user-scalable=no, initial-scale=1, maximum-scale=1, minimum-scale=1, width=device-width">
        <link rel="stylesheet" type="text/css" href="css/index.css">
        <title>Cordova Android Lifecycle Example</title>
    </head>
    <body>
        <div class="app">
            <div>
                <img id="get-picture-result" />
            </div>
            <Button id="take-picture-button">Take Picture</button>
        </div>
        <script type="text/javascript" src="cordova.js"></script>
        <script type="text/javascript" src="js/index.js"></script>
    </body>
</html>
Android Quirks
The default API level in the Cordova-Android platform has been upgraded. On an Android 9 device, clear text communication is now disabled by default.
By default HTTP and FTP etc. will refuse the apps requests to use cleartext traffic. The key reason for avoiding cleartext traffic is the lack of confidentiality, authenticity, and protections against tampering; a network attacker can eavesdrop on transmitted data and also modify it without being detected. You can learn more about the android:usesCleartextTraffic or any other android application elements setting in the documentation for Android developers.
To allow clear text communication again, set the android:usesCleartextTraffic on your application tag to true in config.xml file:
<platform name="android">
  <edit-config file="app/src/main/AndroidManifest.xml" mode="merge" target="/manifest/application">
      <application android:usesCleartextTraffic="true" />
  </edit-config>
</platform>
And also you need to add Android XML namespace xmlns:android="http://schemas.android.com/apk/res/android" to your widget tag in the same config.xml.
Example:
<widget id="io.cordova.hellocordova" version="0.0.1" android-versionCode="13" xmlns="http://www.w3.org/ns/widgets" xmlns:cdv="http://cordova.apache.org/ns/1.0" xmlns:android="http://schemas.android.com/apk/res/android">
</widget>
Android Manifest Information
You can learn more about the Android manifest information in the documentation for Android developers.
Testing the Activity Lifecycle
Android provides a developer setting for testing Activity destruction on low memory. Enable the "Don't keep activities" setting in the Developer Options menu on your device or emulator to simulate low memory scenarios. You should always do some amount of testing with this setting enabled to make sure that your application is properly maintaining state.