Getting Started with Android
This guide describes how to set up your development environment for Cordova and run a sample application. Note that Cordova used to be called PhoneGap, so some of the sites still use the old PhoneGap name.
-
Requirements
- Eclipse 3.4+
-
Install SDK + Cordova
- Download and install Eclipse Classic
- Download and install Android SDK
- Download and install ADT Plugin
- Download the latest copy of Cordova and extract its contents. We will be working with the Android directory.
-
Setup New Project
-
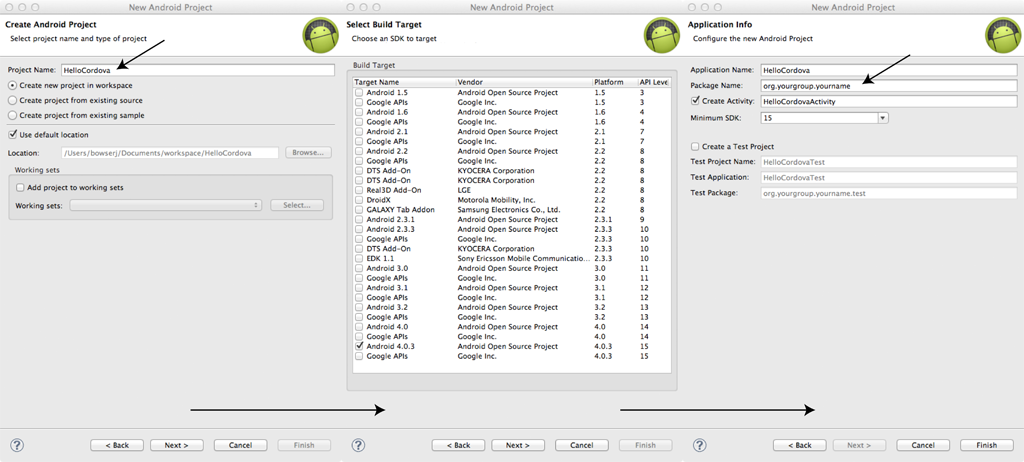
Launch Eclipse, and select menu item New > Android Project. Fill out the three panels of the New Android Project wizard shown below.

- In the root directory of your project, create two new directories: - /libs - assets/www
- Copy cordova-1.6.0.js from your Cordova download earlier to assets/www
- Copy cordova-1.6.0.jar from your Cordova download earlier to /libs
-
Copy xml folder from your Cordova download earlier to /res
-
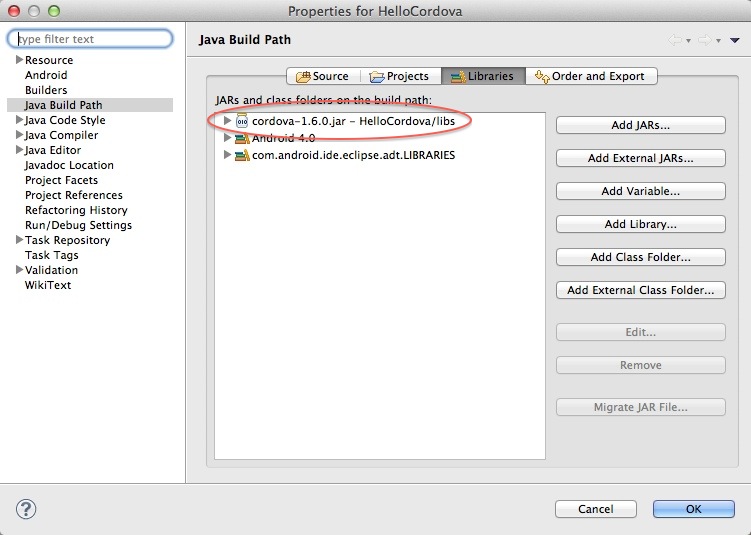
Verify that cordova-1.6.0.jar is listed in the Build Path for your project. Right click on the /libs folder and go to Build Paths/ > Configure Build Path…. Then, in the Libraries tab, add cordova-1.6.0.jar to the project. If Eclipse is being temperamental, you might need to refresh (F5) the project once again.

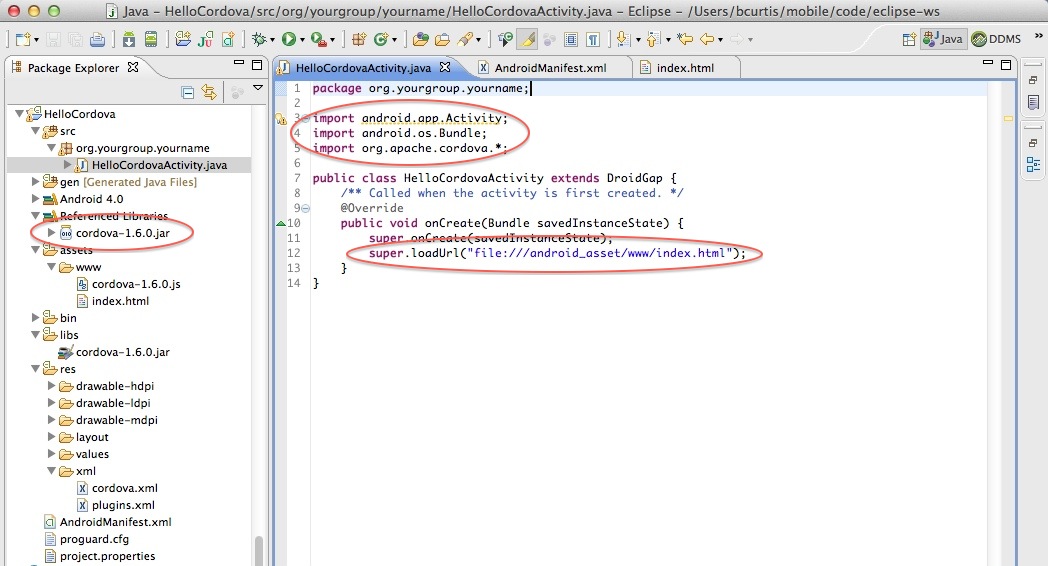
- Edit your project's main Java file found in the src folder in Eclipse:
- Add import org.apache.cordova.*;
- Change the class's extend from Activity to DroidGap
- Replace the setContentView() line with super.loadUrl("file:///android_asset/www/index.html");

- Right click on AndroidManifest.xml and select Open With > XML Editor
-
Paste the following permissions between the <uses-sdk…/> and <application…/> tags.
<supports-screens android:largeScreens="true" android:normalScreens="true" android:smallScreens="true" android:resizeable="true" android:anyDensity="true" /> <uses-permission android:name="android.permission.CAMERA" /> <uses-permission android:name="android.permission.VIBRATE" /> <uses-permission android:name="android.permission.ACCESS_COARSE_LOCATION" /> <uses-permission android:name="android.permission.ACCESS_FINE_LOCATION" /> <uses-permission android:name="android.permission.ACCESS_LOCATION_EXTRA_COMMANDS" /> <uses-permission android:name="android.permission.READ_PHONE_STATE" /> <uses-permission android:name="android.permission.INTERNET" /> <uses-permission android:name="android.permission.RECEIVE_SMS" /> <uses-permission android:name="android.permission.RECORD_AUDIO" /> <uses-permission android:name="android.permission.MODIFY_AUDIO_SETTINGS" /> <uses-permission android:name="android.permission.READ_CONTACTS" /> <uses-permission android:name="android.permission.WRITE_CONTACTS" /> <uses-permission android:name="android.permission.WRITE_EXTERNAL_STORAGE" /> <uses-permission android:name="android.permission.ACCESS_NETWORK_STATE" /> <uses-permission android:name="android.permission.GET_ACCOUNTS" /> <uses-permission android:name="android.permission.BROADCAST_STICKY" /> -
Support orientation changes by pasting the following inside the <activity> tag.
android:configChanges="orientation|keyboardHidden" -
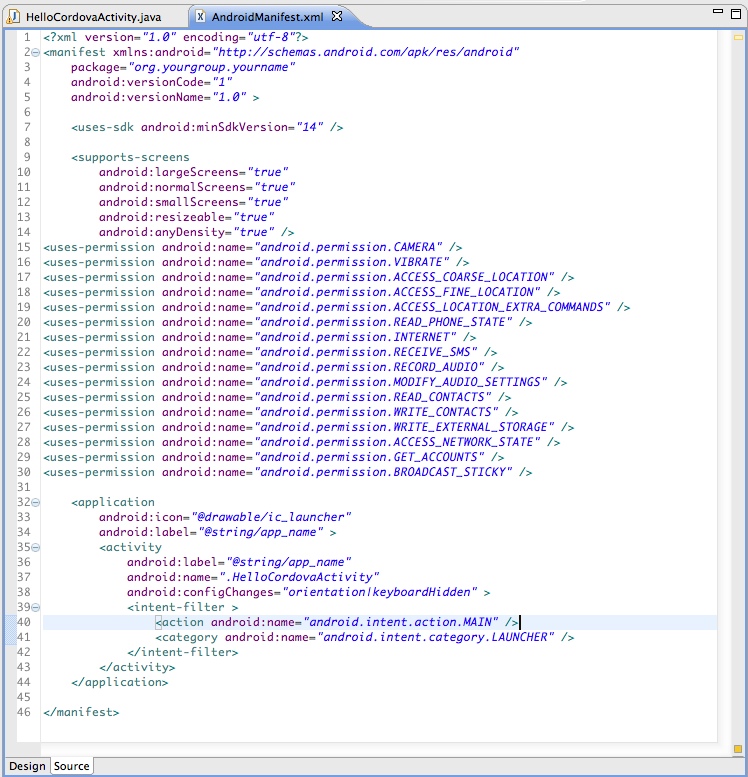
Your AndroidManifest.xml file should look like

-
Create and open a new file named index.html in the assets/www directory. Paste the following code:
  <!DOCTYPE HTML>
  <html>
  <head>
  <title>Cordova</title>
  <script type="text/javascript" charset="utf-8" src="cordova-1.6.0.js"></script>
  </head>
  <body>
  <h1>Hello World</h1>
  </body>
  </html>
5A. Deploy to Simulator
- Right click the project and go to Run As > Android Application
- Eclipse will ask you to select an appropriate AVD. If there isn't one, then you'll need to create it.
5B. Deploy to Device
- Make sure USB debugging is enabled on your device and plug it into your system. (Settings > Applications > Development)
- Right click the project and go to Run As > Android Application